Creating a Golden Image for Azure Virtual Desktop: A Step-by-Step Guide
Setting up Azure Virtual Desktop (AVD) can be a game-changer for IT management, allowing you to deliver a secure, consistent desktop experience to users anywhere. At the core of a streamlined AVD deployment is the golden image—a template virtual machine (VM) configured with everything your users need, from operating system settings to applications and updates.
In this guide, we’ll go through how to create a golden image from scratch, customizing it to meet your organization’s needs and capturing it for future deployments. Ready? Let’s dive in.
Set Up Your Base Virtual Machine (VM)
The first step is to create a VM in Azure that you’ll customize and capture as your golden image.
- Go to the Azure portal and select Create a resource > Virtual Machine.

- Choose an Operating System that supports AVD:
- For pooled host pools, select Windows 10/11 multi-session.
- For personal host pools, choose Windows 10/11 Enterprise.

- Select a Generation:
- Generation 2 is recommended, as it supports additional features not available for Gen 1 machines.
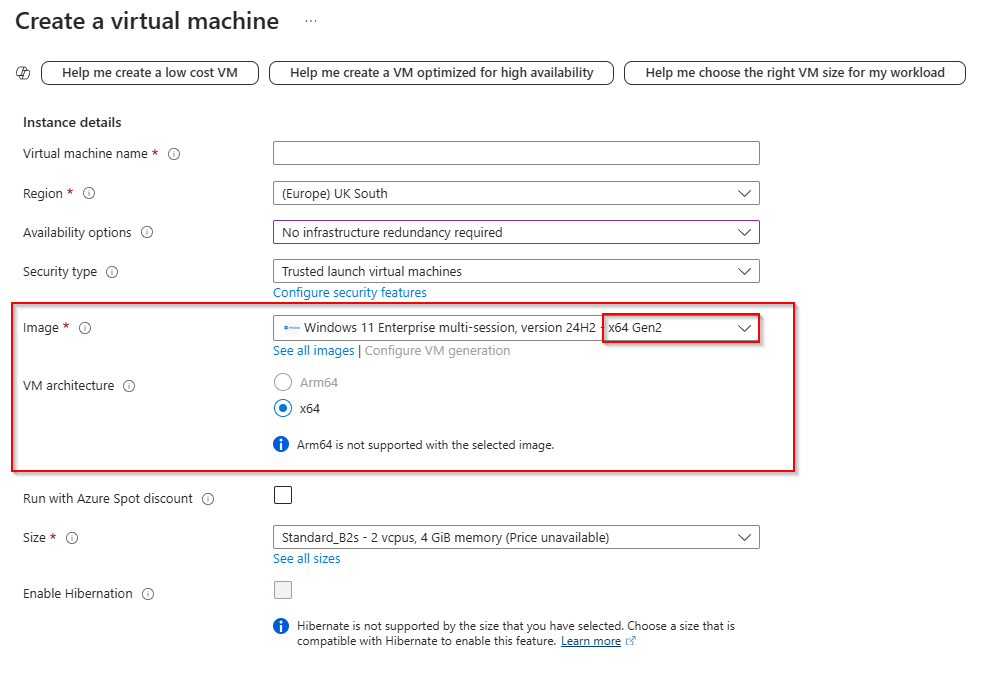
- Important Configuration Note: Ensure that the Login with Entra ID setting is unchecked. This setting can interfere with AVD’s login mechanism, which relies on AD credentials during the deployment of session hosts.

2. Take an Initial Snapshot
Creating snapshots as you customize the VM will let you roll back if needed.
- Navigate to your VM in Azure and select Disks from the left menu.
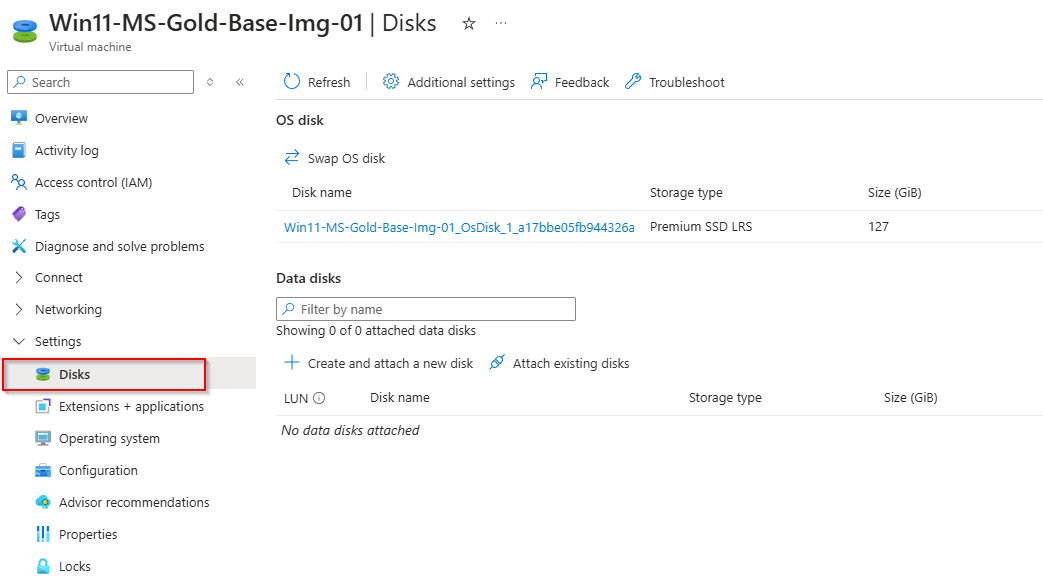
- Under Snapshots, select Create Snapshot.
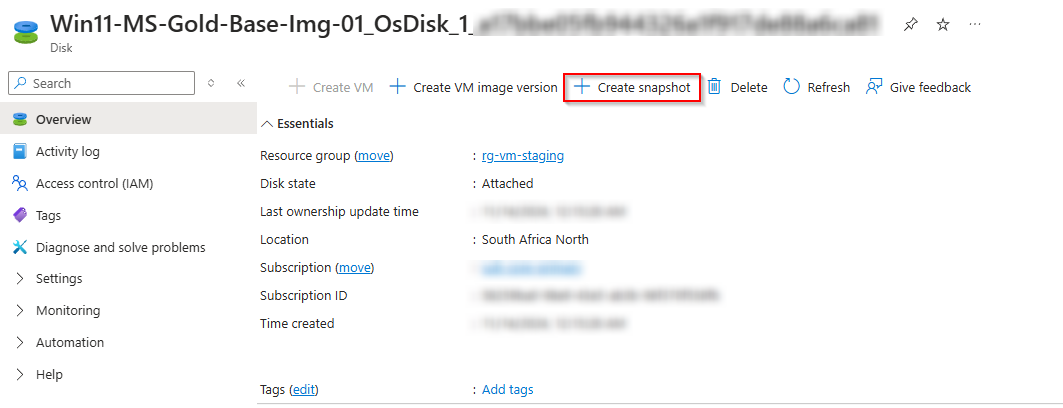
- Name the snapshot something identifiable, like GoldenImage-Initial-Snapshot, so you can quickly locate it later.
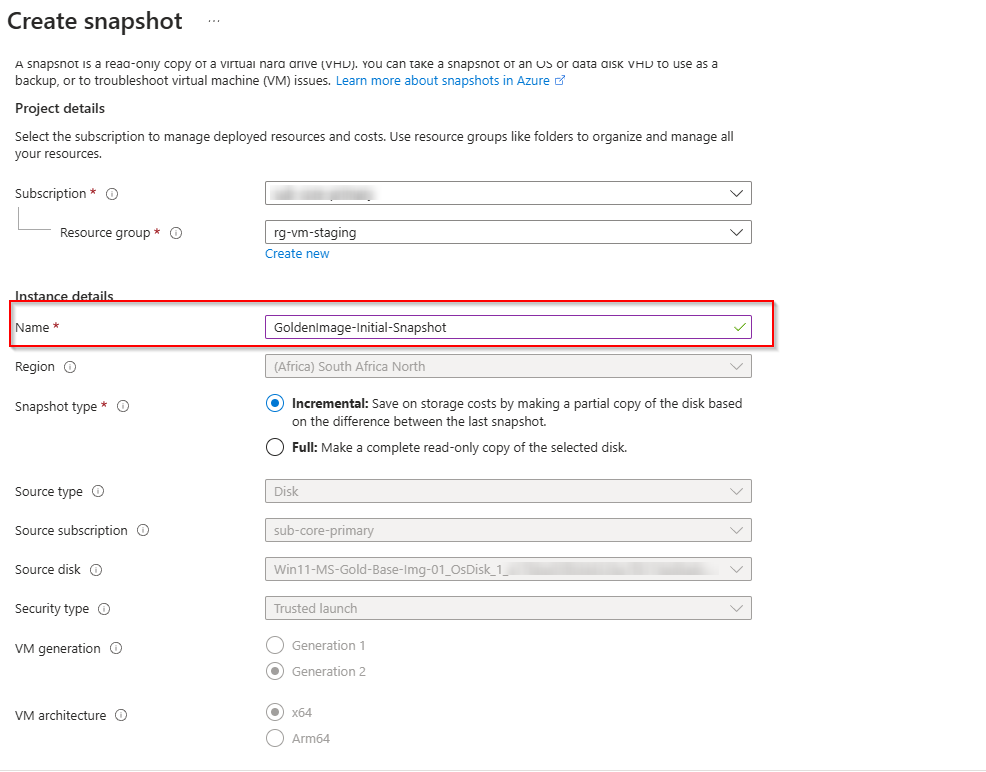
💡 Tip: Take snapshots periodically as you make significant changes to your VM. This way, if anything goes wrong during configuration, you can revert to a previous point instead of starting over.
3. Customize the VM with Applications and Updates
Now it’s time to configure the VM with the applications, configurations, and updates it needs.
- Connect to the VM:
- Use Remote Desktop Protocol (RDP) to log in as an administrator.
- Install Required Applications:
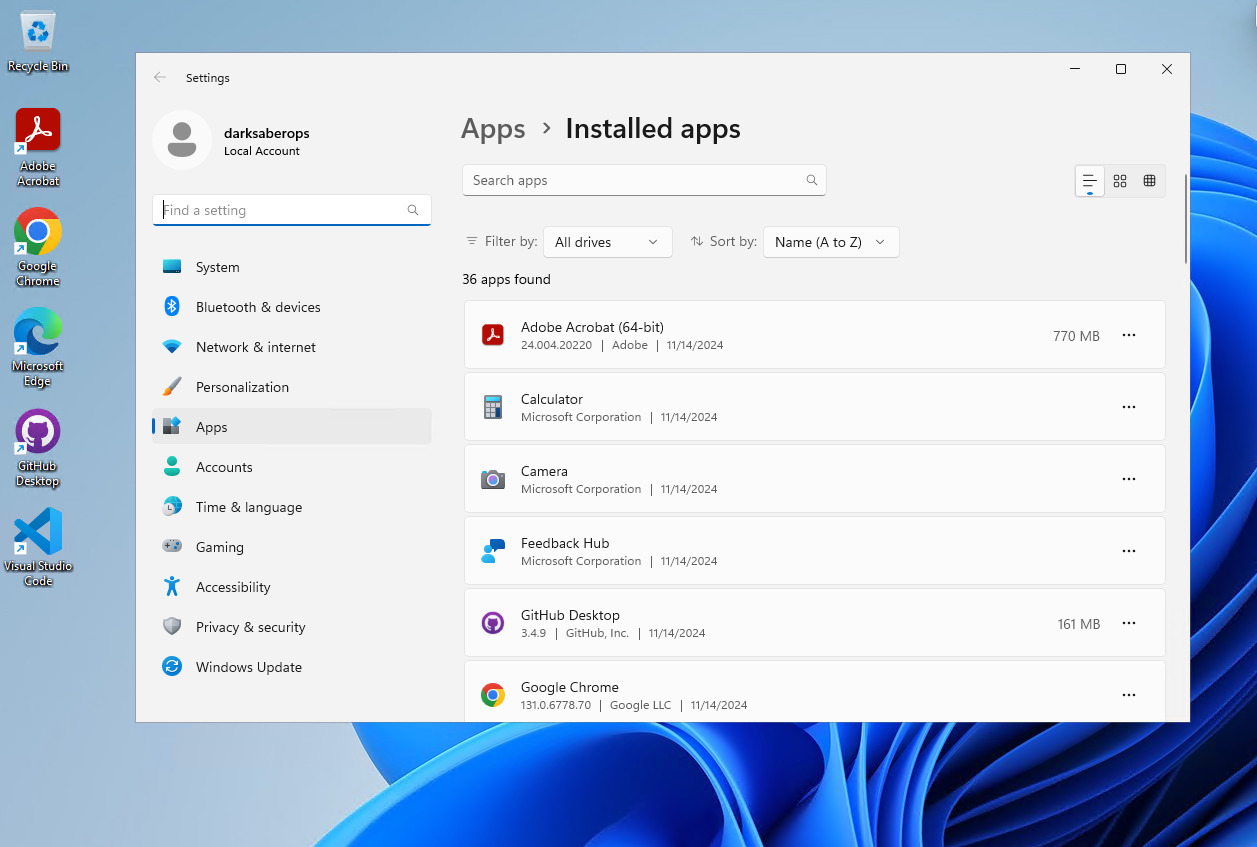
- Add any software your users will need. This might include productivity tools, security software, or specialized applications for your organization. For this example I have installed the following apps, Adobe Reader, Google Chrome, GitHub Desktop, Visual Studio Code.
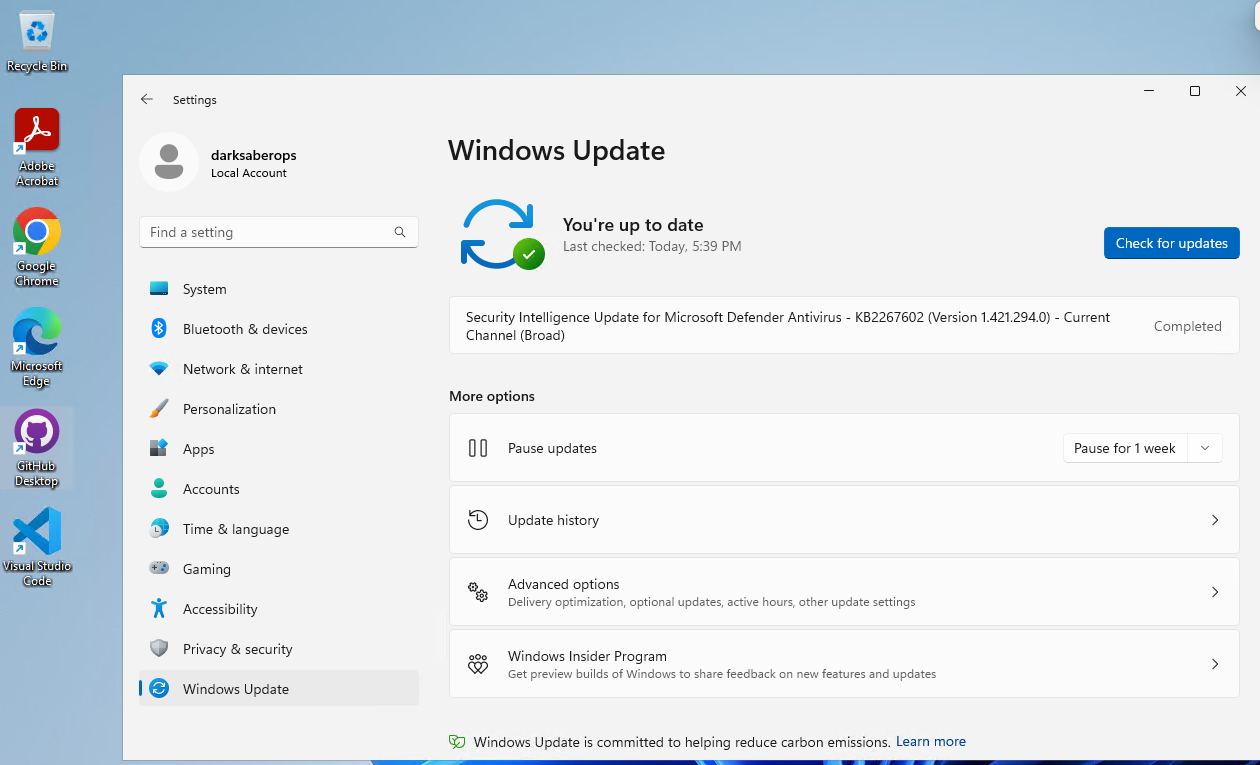
- Apply Windows Updates:
- Ensuring your VM is fully updated now will save you from needing to patch each deployed instance individually.
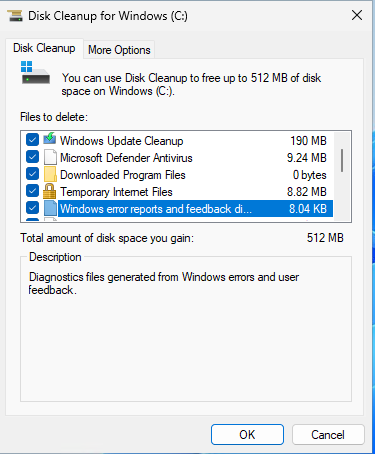
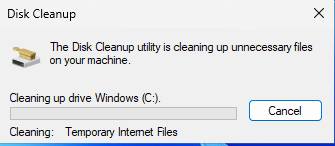
- Perform Cleanup and Optimization:
- Remove temporary files, unnecessary user profiles, and optimize the disks for better performance.
- Using Storage Sense (Windows 10/11):
- Open Settings > System > Storage.
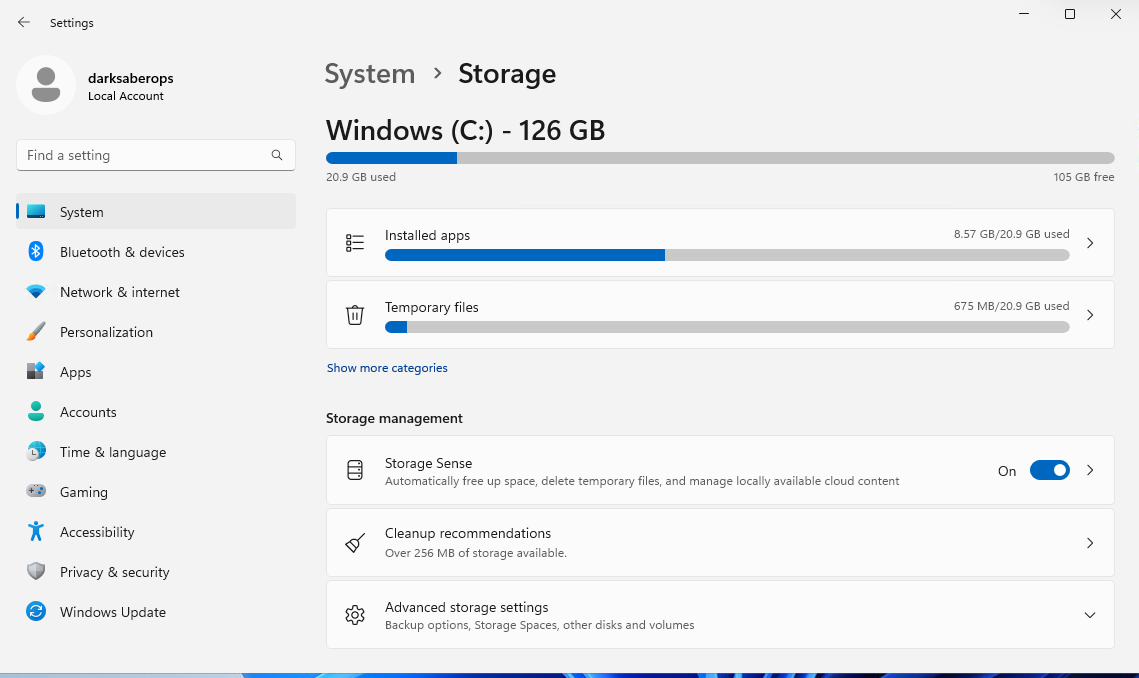
- Enable Storage Sense and configure it to automatically delete temporary files and empty the recycle bin on a schedule.

- Click on Configure Storage Sense or run it now to set up specific conditions, like deleting files every day, week, or month.
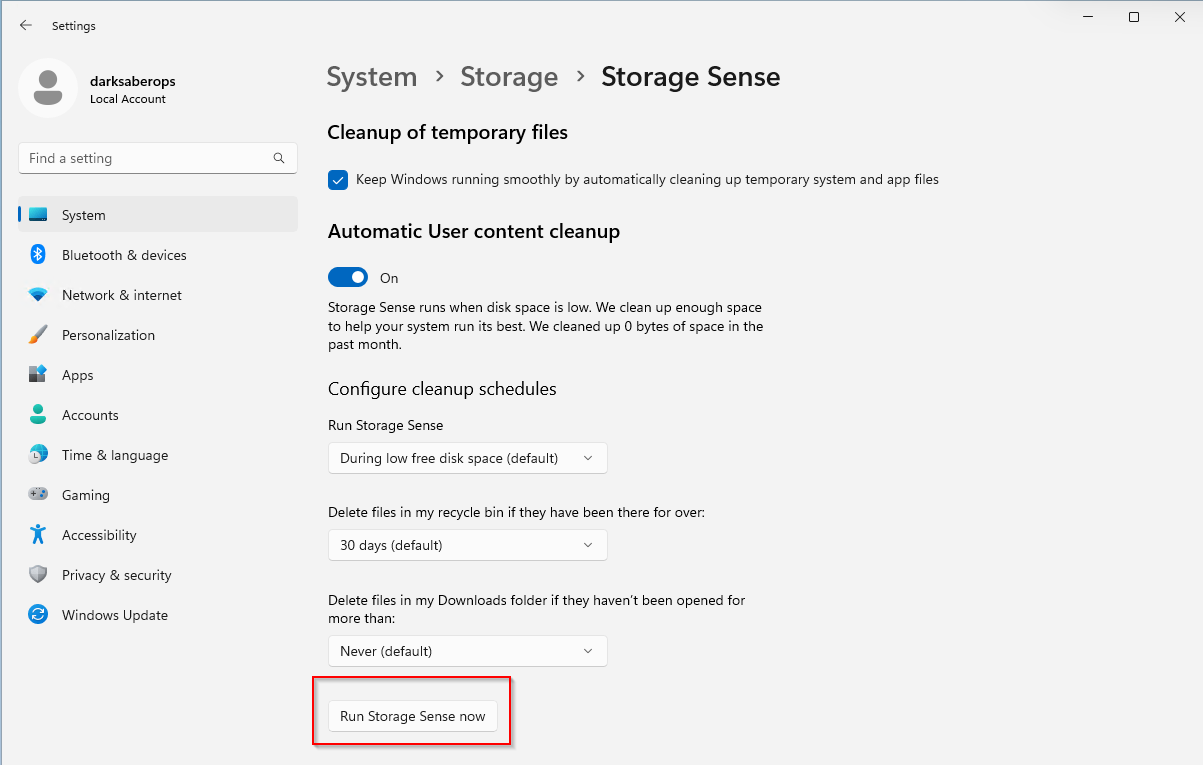
- Disable Antivirus Temporarily:
- If you’re adding antivirus software, disable it before the next step to avoid potential issues when you generalize the image using sysprep.
4. Take a Final Snapshot Before Generalizing
Before proceeding with sysprep (a tool to prepare the VM for duplication), take one last snapshot.
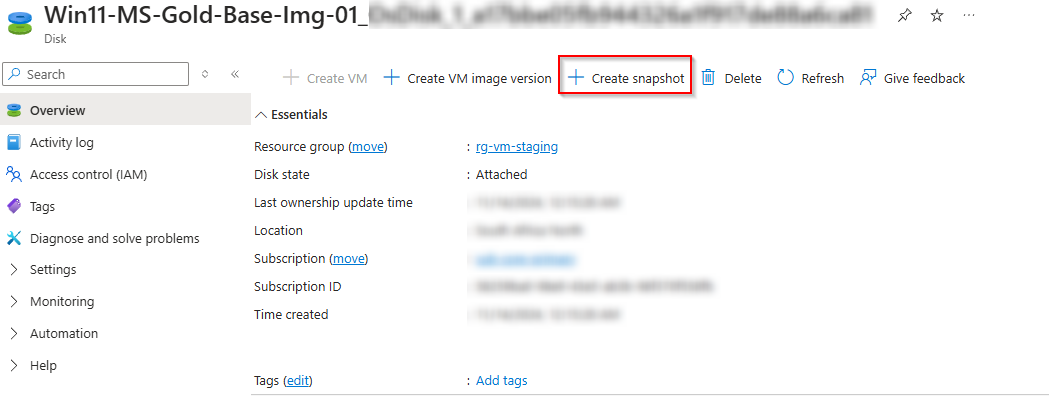
- Go to the Disks section for your VM in the Azure portal.
- Select Create Snapshot and give it a name like GoldenImage-Final-Snapshot.
5. Run Sysprep to Generalize the Image
Sysprep prepares the VM by removing unique system identifiers so the image can be deployed multiple times.
- Open Command Prompt as Administrator on the VM.
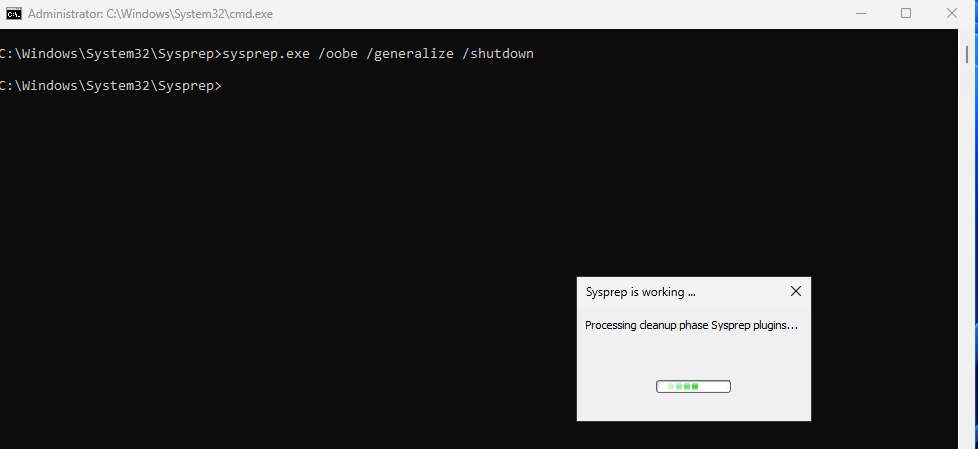
- Run the following command to generalize the image and shut down the VM:
C:\Windows\System32\Sysprep\sysprep.exe /oobe /generalize /shutdown

Process starting to generalize the Operating System
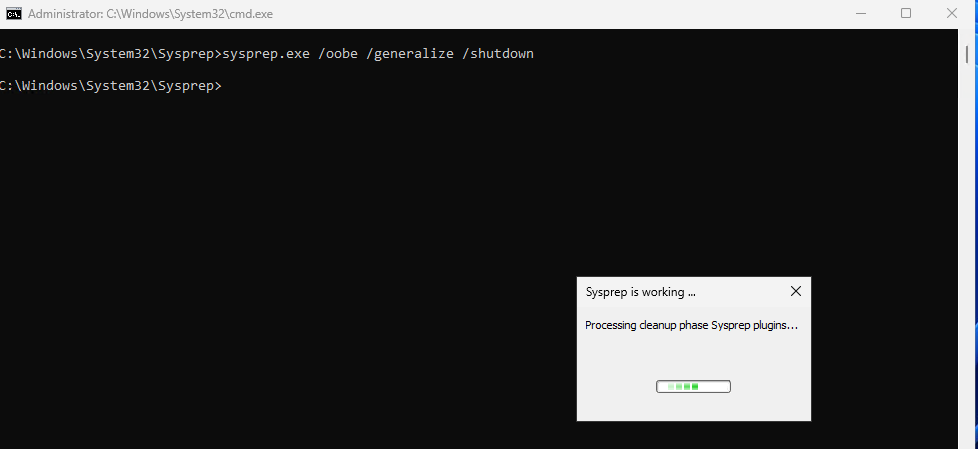
- Wait for the VM to shut down automatically, indicating that sysprep has completed.
💡 Tip: Avoid running any software that generates unique system identifiers before this step, as sysprep will remove them anyway.
Troubleshooting Sysprep Errors: BitLocker Encryption Blocking Sysprep
When preparing a golden image in Azure, one common issue you might encounter is a Sysprep failure due to BitLocker encryption being enabled on the OS volume. This is indicated by an error message in the Sysprep log similar to:
SYSPRP BitLocker-Sysprep: BitLocker is on for the OS volume. Turn BitLocker off to run Sysprep. (0x80310039)

Why This Happens
Sysprep requires that the OS drive be free of encryption, as BitLocker can interfere with the generalization process. If BitLocker is active on the drive, Sysprep will not be able to proceed, resulting in a failure. This is common in environments where BitLocker is enabled by default for security compliance.
Fixing the BitLocker Sysprep Error
To resolve this issue, you’ll need to temporarily disable BitLocker on the OS volume before running Sysprep. Here’s how:
- Open PowerShell as Administrator on your Azure VM.
- Run the following command to disable BitLocker on the C: drive:
Disable-BitLocker -MountPoint “C:”

- Monitor the Decryption Process:
- BitLocker decryption can take some time, depending on the amount of data and drive size. You can check the status by running:
Get-BitLockerVolume -MountPoint “C:”

Fully Decrypted will look as follows:

Look for the PercentageEncrypted property; it will decrease as decryption progresses. Ensure decryption completes before proceeding.
- Run Sysprep Again:
- Once BitLocker has been fully disabled, attempt to run Sysprep again:
C:\Windows\System32\Sysprep\sysprep.exe /oobe /generalize /shutdown
Important Note
After Sysprep completes and you capture the image, you may re-enable BitLocker encryption if required by your organization’s security policies. However, it’s recommended to wait until after the VM has been deployed as a session host to avoid issues during image capture and deployment.
With the VM generalized, we’re ready to capture it as a reusable image.
- Go to the Azure portal and open the VM.
- Select Capture from the VM menu.

- Choose the Destination:
- Azure Compute Gallery: Recommended for production environments as it allows for replication, high availability, and versioning.
- Managed Image: Suitable for simpler deployments that don’t require extensive scaling.
- After capturing, delete the original VM. Reusing it after capturing can cause conflicts.
6. Language Pack Configuration (Optional)
If you have multilingual users, you can add multiple language packs to the image.
- Download Language Pack ISOs from Microsoft’s repository.
- Mount the ISOs on your VM, copy the files to a shared folder accessible by the VM, and install languages via PowerShell.
- Use the following PowerShell command to install languages like Spanish, French, and Chinese:
$LanguageList = Get-WinUserLanguageList
$LanguageList.Add(“es-es”)
$LanguageList.Add(“fr-fr”)
$LanguageList.Add(“zh-cn”)
Set-WinUserLanguageList $LanguageList -force
- Verify that the languages installed correctly by checking Settings > Time & Language > Language on the VM.
7. Capture the VM as an Image
When capturing your golden image for Azure Virtual Desktop, it’s best to use Azure Compute Gallery (formerly known as Shared Image Gallery). This gallery allows you to manage, version, and replicate your images across regions, making it ideal for production environments where you want high availability and scalability.
If you don’t already have an Azure Compute Gallery, you’ll need to create one before proceeding with the capture.
Navigate to the Capture Option in Azure
- Open the Azure Portal.
- Navigate to the Virtual Machines section and select the VM you want to capture.

Start the Capture Process
- In the VM’s menu, click Capture.
- In the Capture Image screen, configure the following:
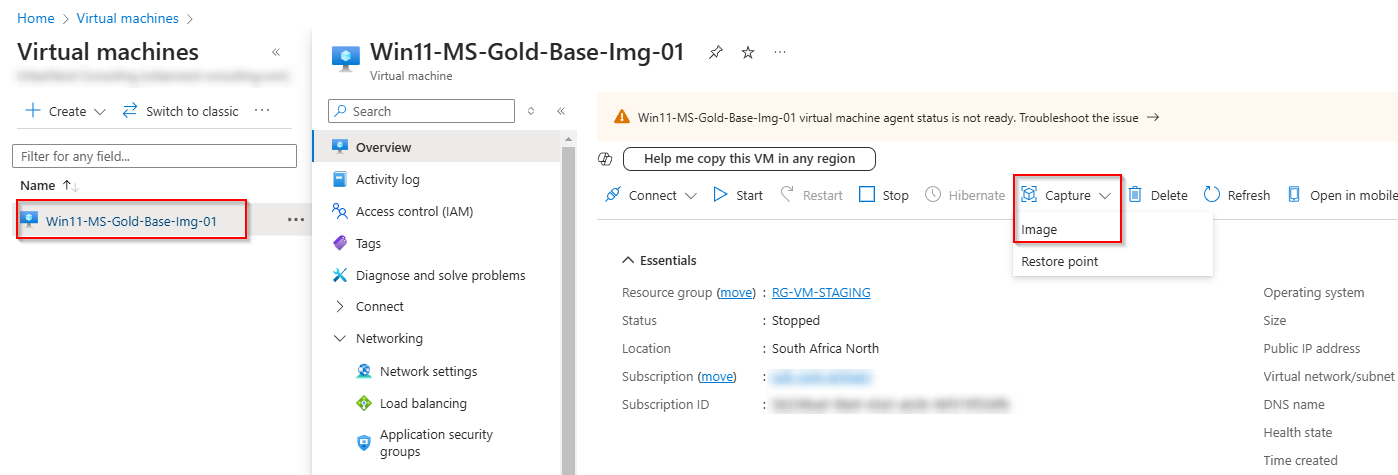
-
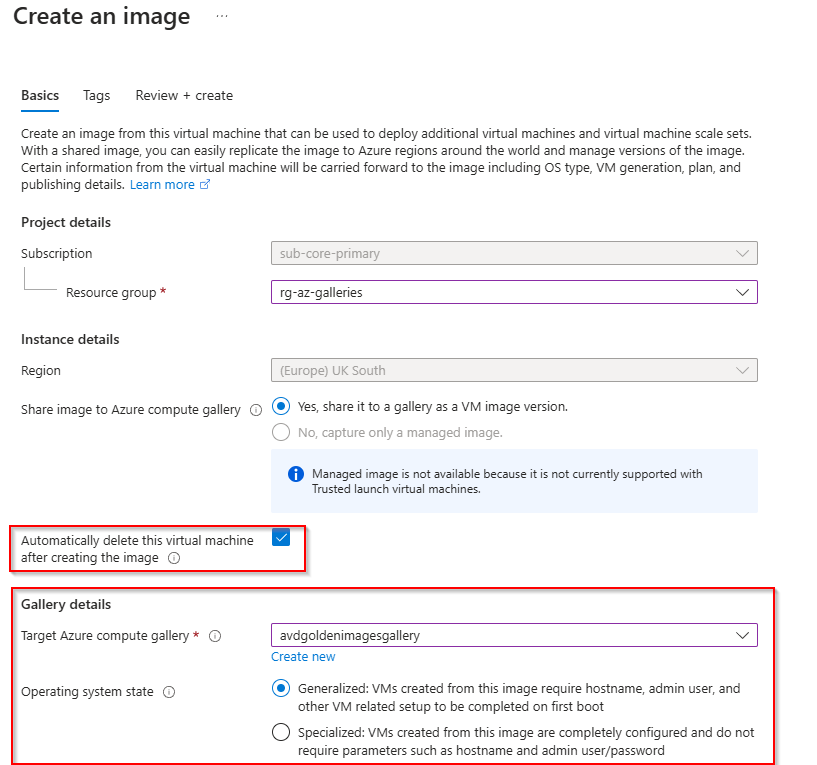
- Resource Group: Choose the resource group where the image will be saved.
- Destination:
- Select Azure Compute Gallery if you plan to use shared images across multiple regions.
- Specify the Target Azure compute gallery
- Select “Generalized” for Operating system State
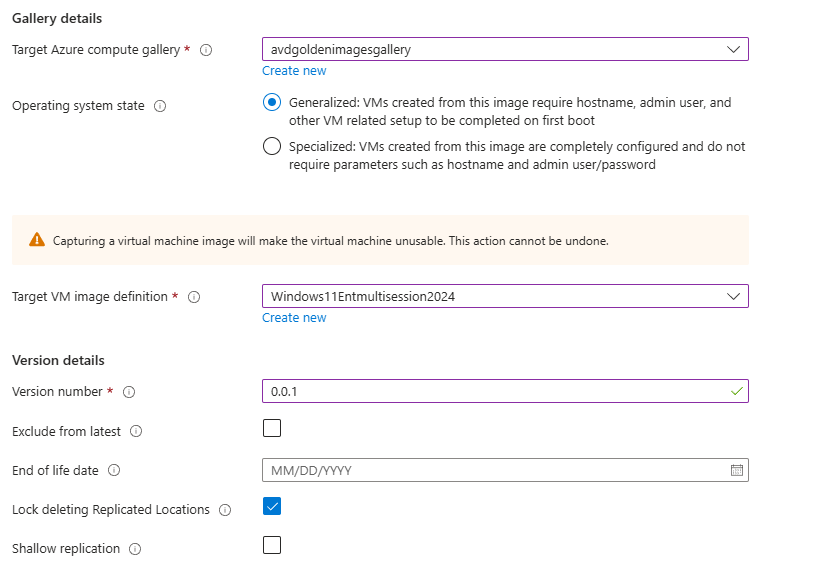
On the Target VM Image definition, select the VM definition. PS. You will have to create the definition before you can continue, the steps below will show you how to create it if you don’t have any definitions configured.
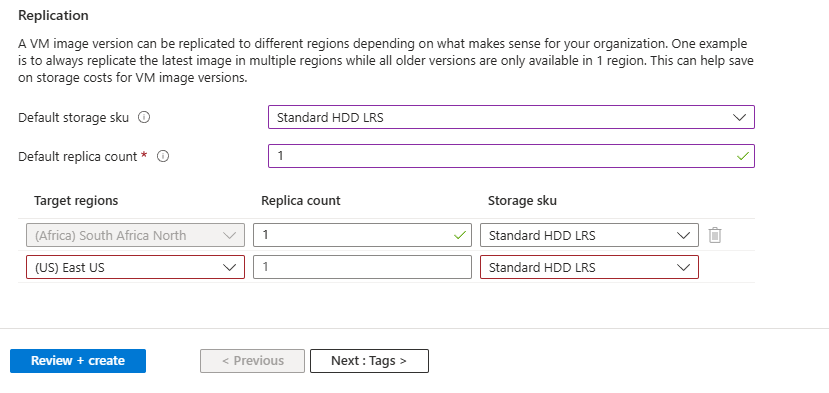
On the next section, you need to specify the Replication. For this demo I will change the redundancy to “standard HDD LRS” and the click “Review + Create”
Creating a New Azure Compute Gallery
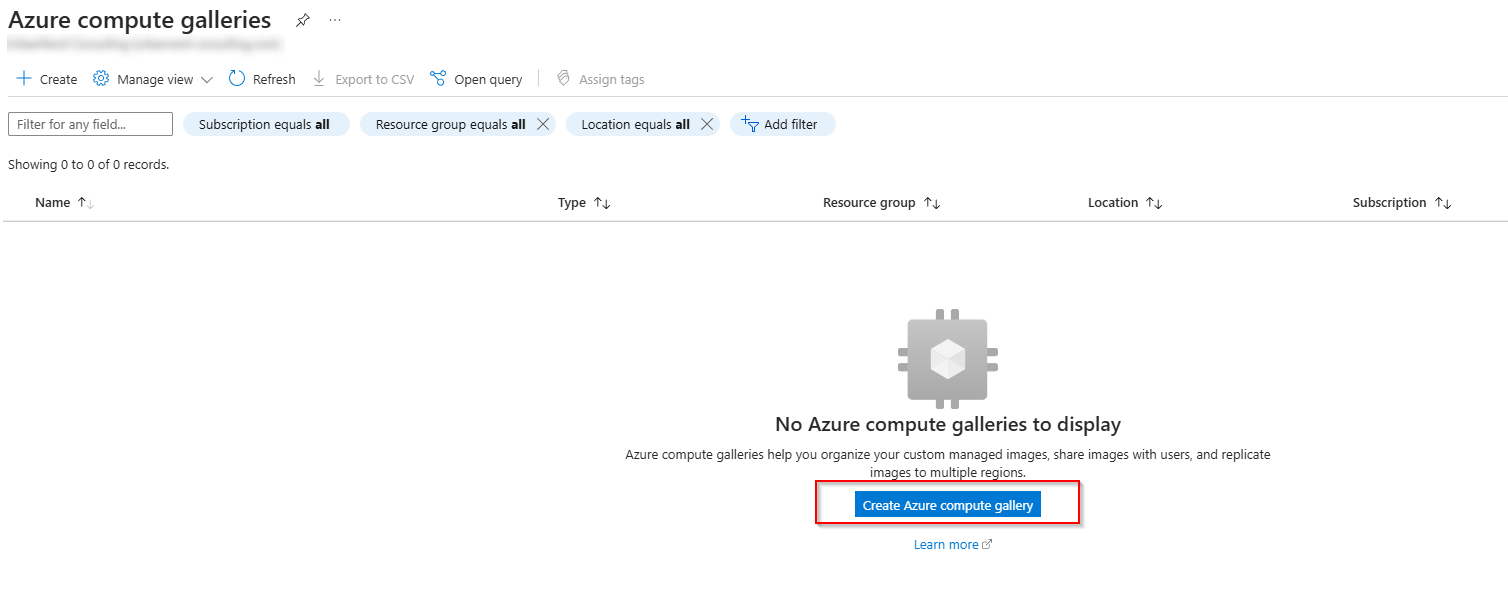
- Go to the Azure Portal and search for Azure Compute Gallery in the top search bar.

- Select + Create to start setting up a new gallery.
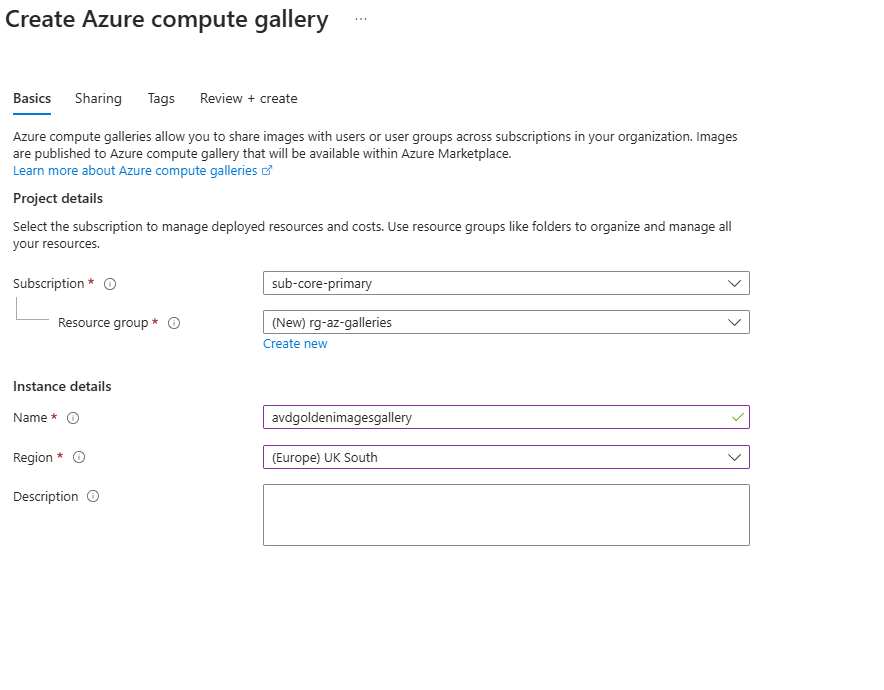
- Configure the Basic Settings:
- Subscription: Select the Azure subscription where you want to create the gallery.
- Resource Group: Choose an existing resource group or create a new one.
- Gallery Name: Give your gallery a descriptive name, like AVD-GoldenImages-Gallery, to easily identify it as the storage location for your AVD images.
- Region: Select the primary region where you’ll use this image. (You can replicate it to other regions later if needed.)
- Review and Create:
- Confirm your settings, then select Review + Create and Create to finish setting up the gallery.

Now that we have the Image captured in Azure Galleries, we need to go ahead and create the Image Definitions so that the image can be visible.
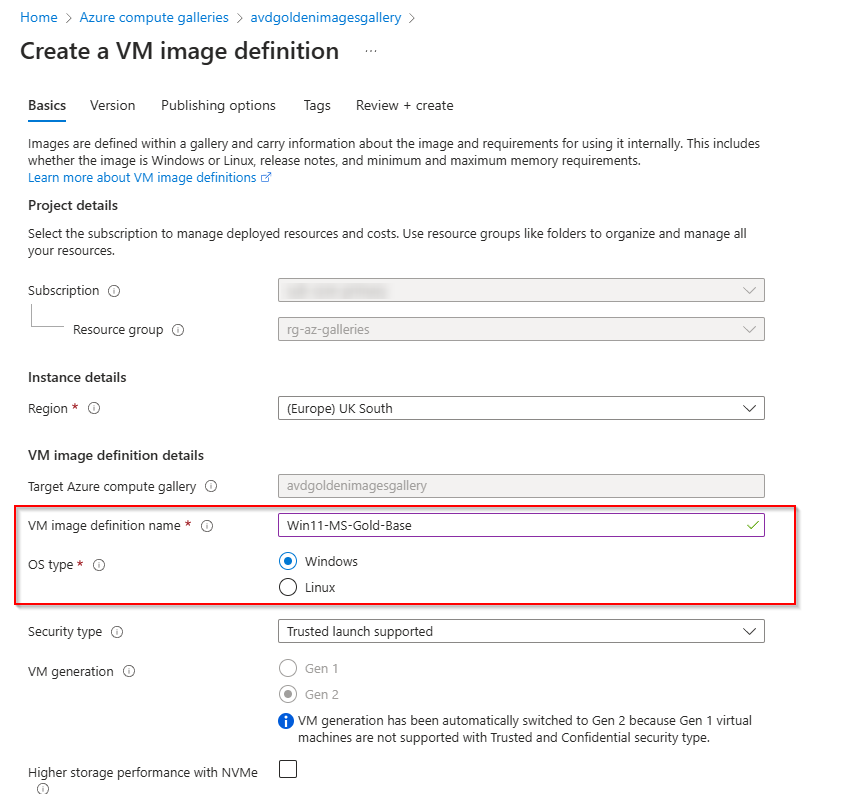
Step 1: Create an Image Definition
- Go to Azure Compute Gallery:
- Search for Azure Compute Gallery in the Azure portal.
- Select your existing gallery or create a new one if needed.
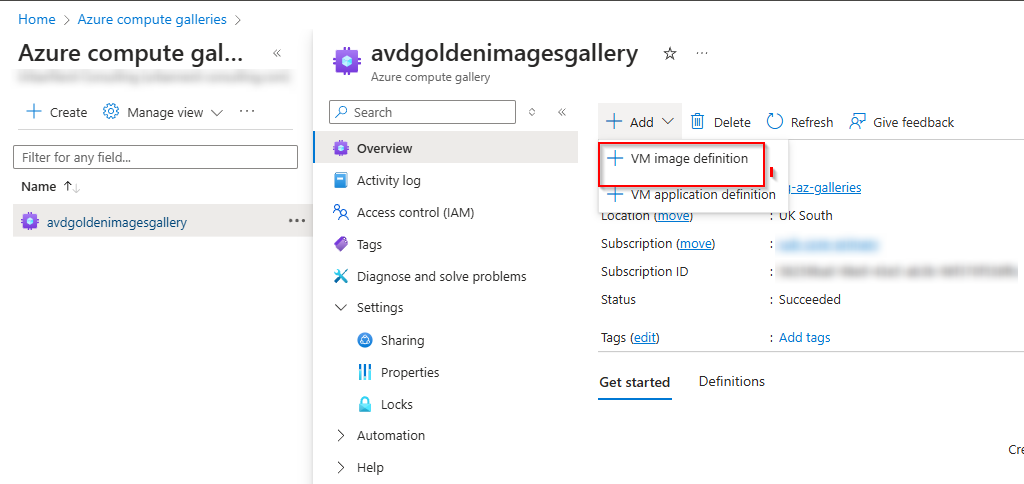
- Add an Image Definition:
- Inside the gallery, click on + Add Image Definition.
- Fill in Image Definition Details:
- Name: Give your image definition a descriptive name (e.g., Win11-MS-Gold-Base).
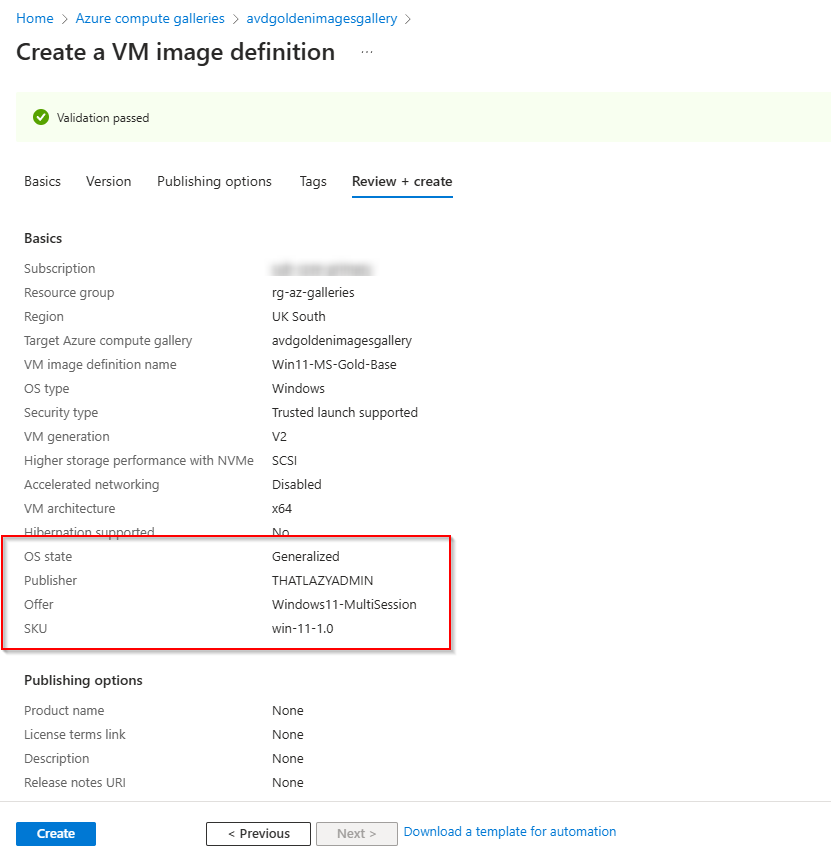
- Publisher: Enter a publisher name (e.g., THATLAZYADMIN).
- Offer: Enter a product or offer name (e.g., Windows11-MultiSession).
- SKU: Specify a stock-keeping unit (e.g., 1.0.0).
- Operating System: Choose the correct OS type (e.g., Windows).
- Operating System State: Select Generalized (since you’ve run Sysprep on the VM).
- Hypervisor Generation: Choose Gen 2 for modern deployments.

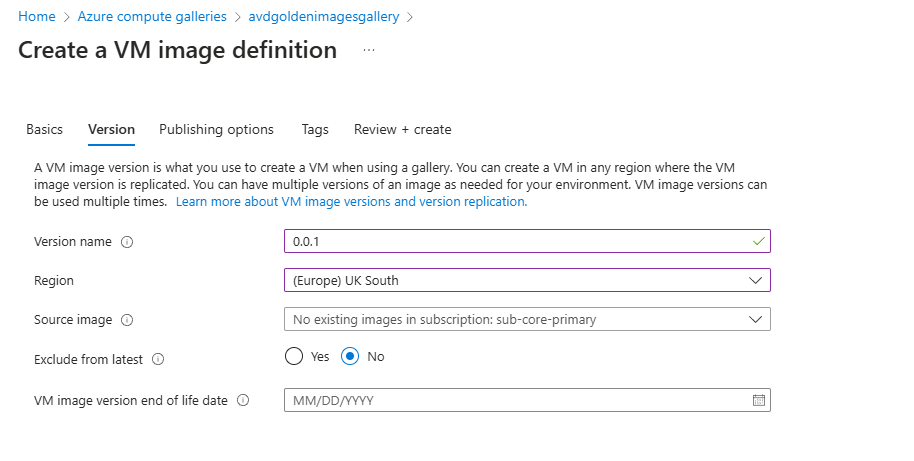
On the Version tab, specify the version settings for this Golden Image. You also have the option to specify the end-of-life date for the image. However, we will leave that blank for this demo.
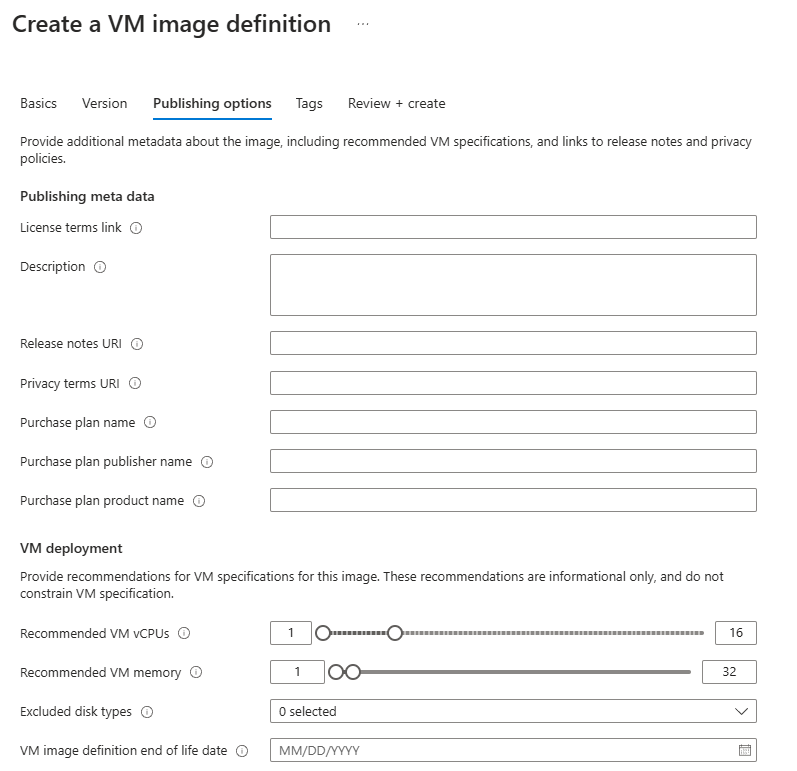
On the next section you can configure the Publishing options, however for this demo I will leave this blank and then click on create.
- Click Create:
- Review your settings and confirm the creation of the image definition.
8. Deploying Session Hosts from Your Golden Image
Once you’ve captured your golden image, it’s ready to use for deploying session hosts in Azure Virtual Desktop.
- Navigate to your AVD Host Pool in the Azure portal.

- Under Session Hosts, select Add and choose your golden image.
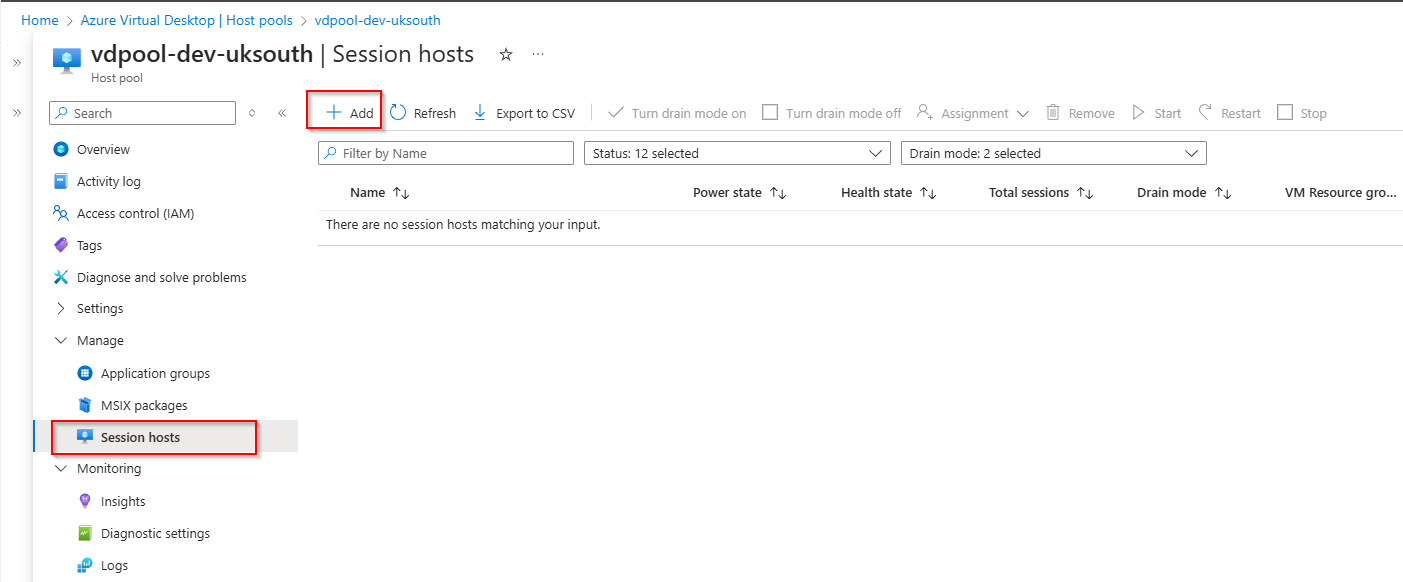
Click next on the Basic Menu to head over to the Virtual machine Configuration.
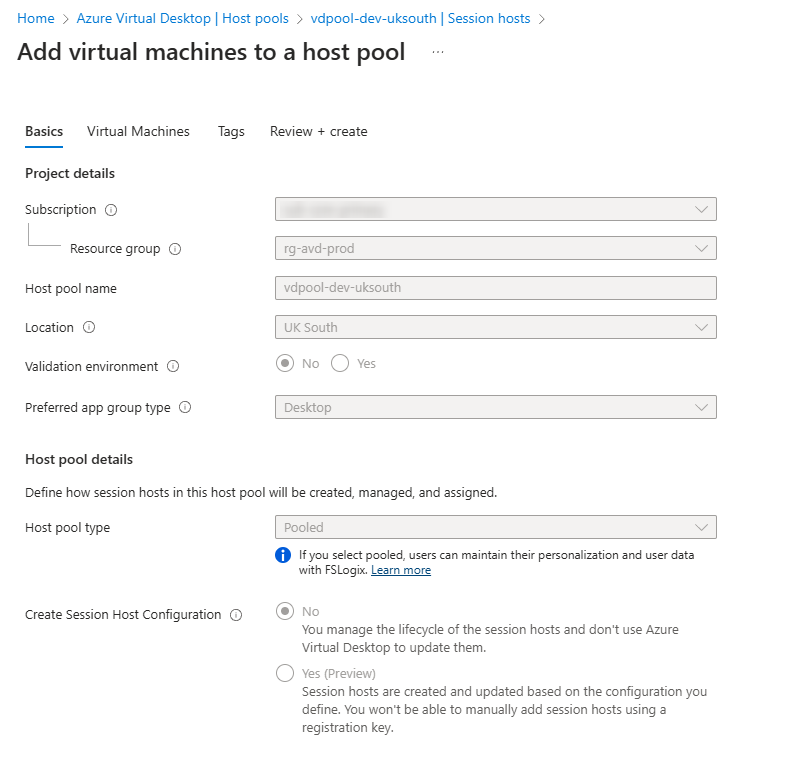
Specify the details for the Virtual machine.

On the Image section, select the Golden Image created > Image.

From the Images click on “Shared Images” on the left hand-side and then select the Golden Image.

Continue with the additional virtual machine requirements, then click on Review + Create.
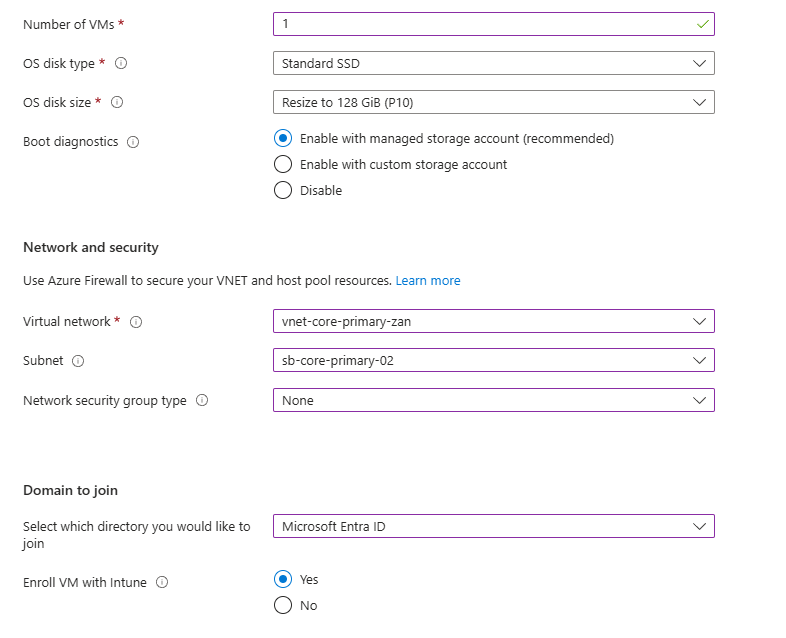
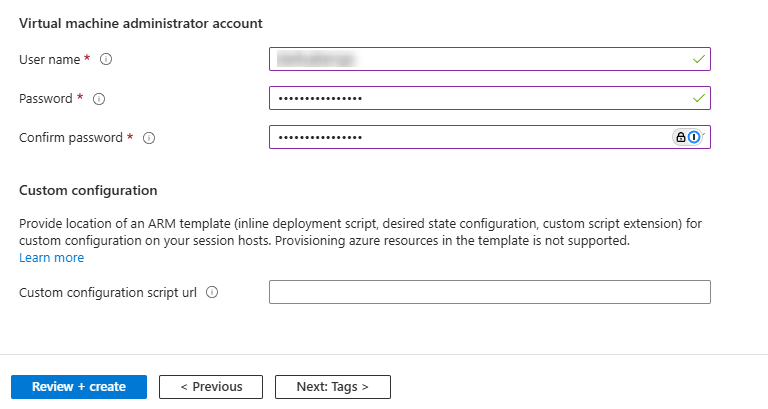
Connecting to the New Azure Virtual Desktop (AVD) Session Host in the Host Pool
After deploying a new session host using your golden image, the next step is to ensure it’s properly configured and accessible. This involves connecting to the new session host in the Azure Virtual Desktop (AVD) Host Pool and verifying that the deployment was successful. Follow the steps below to connect to your session host:
Verify the New Session Host Deployment
- Navigate to the Azure Portal.
- Go to Azure Virtual Desktop > Host Pools.

- Select the host pool where the new session host was deployed.
- Click on the Session Hosts tab and ensure that the newly deployed session host is listed and shows a status of Available.
With the new session host successfully deployed from the Golden Image, it’s time to connect to it using the Azure Virtual Desktop (AVD) client. Let’s walk through the process to access and verify the session host.
Launching the Azure Virtual Desktop (AVD) Client
To connect to your newly deployed session host, we’ll use the latest Azure Virtual Desktop Client for Windows, which provides a seamless and reliable experience for AVD connections.
Steps to Connect
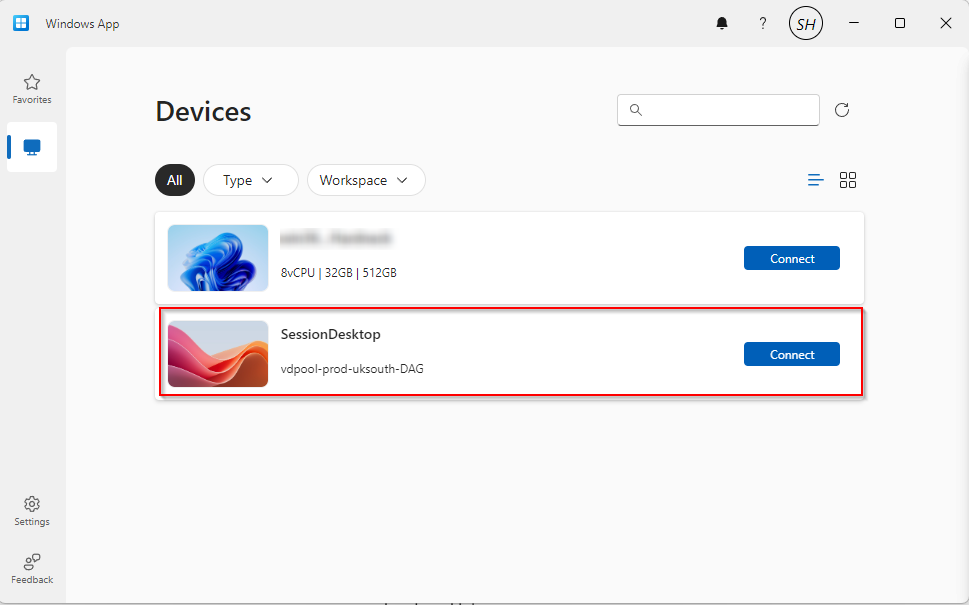
- Open the AVD Client:
- Ensure you have the latest version of the AVD client installed on your machine. If not, download it from Microsoft’s AVD Client page.
- Sign In:
- Launch the AVD client and log in using your Azure Active Directory (AAD) credentials.
- Select Your Session Host:
- Once signed in, you will see a list of available session hosts. Locate the newly deployed session host from your host pool.
- Connect to the Session Host:
- Click on the session host to initiate the connection. The client will establish a remote desktop session, and you will be prompted to log in with your credentials.
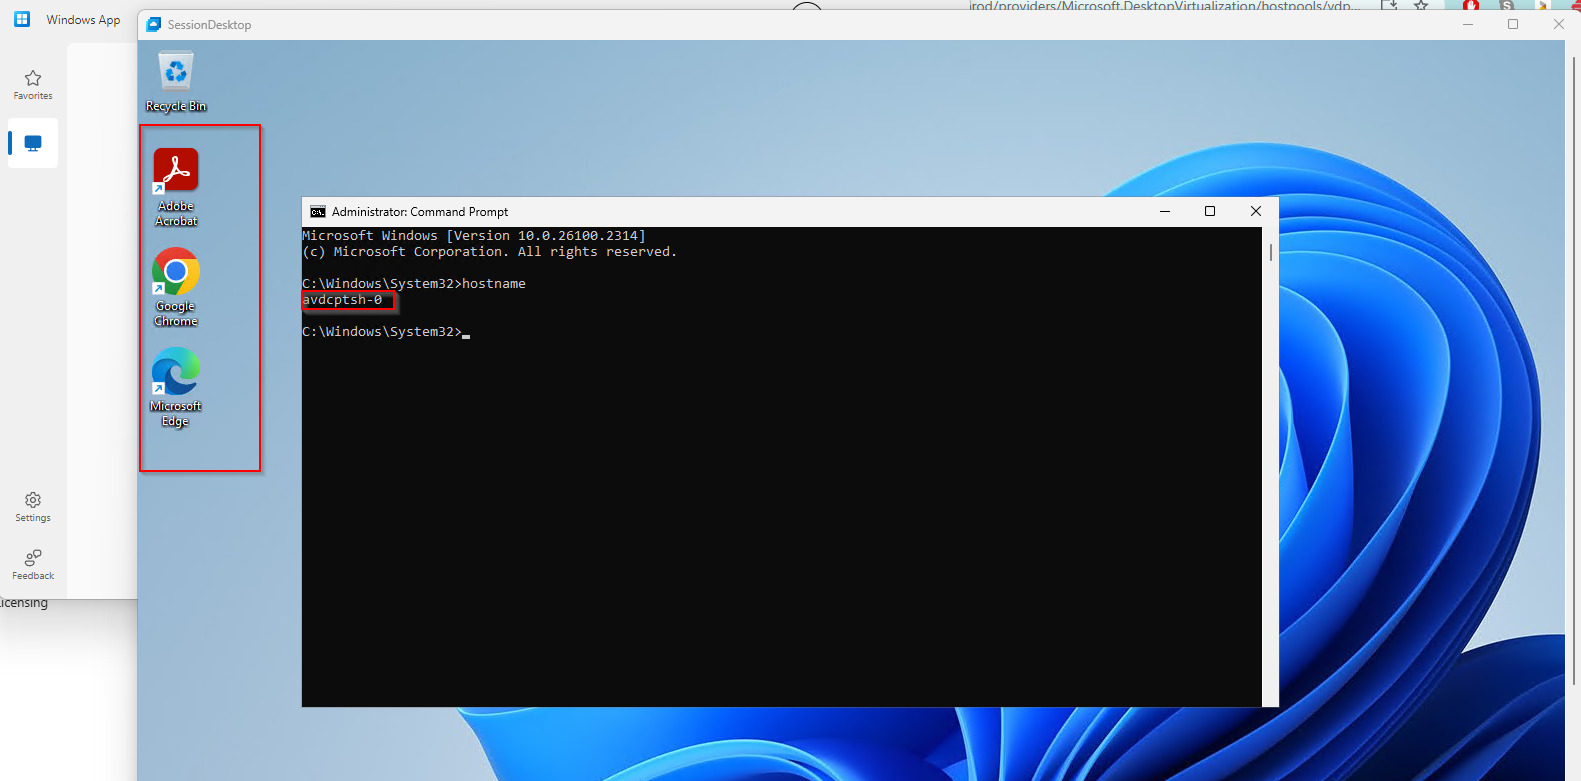
Maintenance and Updates
Maintaining your golden image with regular updates ensures consistent performance and security across your AVD environment. Here are some best practices:
- Schedule Regular Updates:
- Set aside time each month or quarter to apply updates to your golden image.
- Take New Snapshots:
- Before making updates, create a new VM from your latest snapshot and update it.
- Re-run Sysprep and Capture:
- After applying updates, run sysprep, take a final snapshot, and capture the updated image.
Conclusion
Creating a golden image for Azure Virtual Desktop is an essential step in ensuring a smooth, consistent, and scalable deployment across your organization. By following these steps, you’ll have a master image that you can use to deploy session hosts with all necessary configurations and applications. This will save time, simplify management, and ensure that every user has the same optimized experience.
If you follow this guide, you’ll find setting up and maintaining your golden image to be straightforward, efficient, and rewarding for the long-term success of your AVD deployment.
About the Author
Shaun Hardneck is a seasoned Microsoft Cloud Infrastructure Specialist with extensive experience in Azure Virtual Desktop, Microsoft 365, and enterprise cloud solutions. As the creator of the blog ThatLazyAdmin, Shaun shares insights, tutorials, and best practices to help IT professionals excel in their roles.
You can reach out to him for assistance with your projects, including proof-of-concept (POC) setups, tailored solutions, and expert guidance in optimizing your cloud infrastructure.

Be First to Comment