Last updated on Apr 4, 2019
Configure Azure AD Connect Pass Through Authentication
Azure pass-through authentication allows user to login to cloud and on-premise applications by using the same passwords. Pass-through authentication validated the password against the on-premise active directory.
Prerequisite needed:
- Global Admin account
- Azure AD Connect 1.1.750.0 or later
- Windows Server 2012 R2 or later with TLS 1.2 enabled
- Firewall Ports and Proxy Urls.
To start the process, Launch the Azure AD Connect installation > click on “I agree “for the license terms and then click continue.
On the express settings page, click customize if you are installing Azure AD Connect using an existing SQL server.

Provide the details of the sql server and then click install.
Provide the Global Administrator account login details to connect to Azure AD and then click next.

Next you will be prompted to provide login details for an “enterprise administrator” credentials. Once done click next.

On the next windows you will see which of your on-prem UPN suffix matches that of a verified domain in Azure AD.

Click on “continue without matching all UPN suffixes to verified domains” , this warning will be there if you have an on-prem domain for example allcloud.local

On the next page, you will see a summary of what will be configured, click on “Install” to start the process.

On the last screen you will see a configuration complete screen, with some recommendation if there is any.

Click on exit to finish.
Next open “Azure AD Connect” from the desktop icon then click Configure.

Next click on “Change user sign-in” then click next.

Provide the “Global Administrator” username and password then click next.

You might receive the following error “Cannot change configuration”, this is because a synchronization is currently in progress.
To resolve this error: Open Windows PowerShell then type the following
|
1 |
Import-Module Adsync |

Then type:
|
1 |
Set-ADSyncScheduler -SyncCycleEnabled $false |

Once done, go back to the Azure AD Connect application and enter the global administrator username and password again.

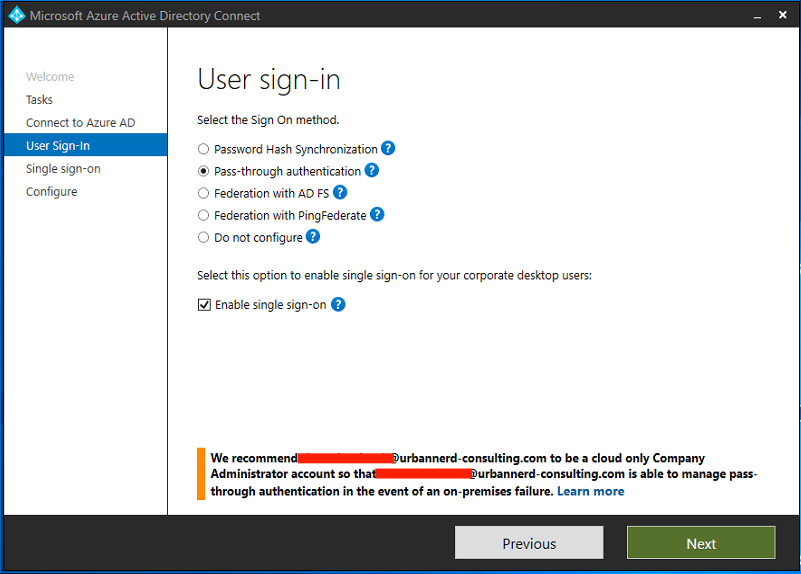
On the next screen, you will be able to modify the user sign-in methods. From the menu select “Pass-through Authentication”, also from the say menu select “Enable single sign-on” to allow single sign-on for your corporate desktop users.

You will notice at the bottom of the screen a message indicating that the account you are currently connected with to Azure AD with be your “Cloud Only company Administrator account”
This means that in the event of on-premise failure this account will be able to manage Pass-Through Authentication. Do not Lose this account!!

Click on Next to continue to setup.
The next set is to configure an On-Premise “Domain Administrator” account which will be used to configure “Single sign-on”
Click on “Enter credentials” to provide the domain administrator username and password.


Once you have entered the credentials you will see a green tick, then click on next.

On the last page, you will see a summary of what the tool will be configuring, click on configure to start the process.

Click on Exit to close the Azure AD Connect tool.

Before the synchronization process will start again, we need to enable it again.
To enable synchronization launch Windows PowerShell and run the following.
|
1 |
Import-Module ADSync |

Then
|
1 |
Set-AdSyncScheduler -SyncCycleEnabled $true |

To start a synchronization run.
|
1 |
Start-ADSyncSyncCycle -PolicyType Delta |

From any machine in the organization, open any one of the following Urls and you will notice that you are not prompted for Username and Password.
Happy single sign-on’s 🙂

Be First to Comment