
Author Bio: Deeksha Negi is a cloud technology geek and a regular blogger at www.office365tips.org website. Her interests are doing research on Microsoft Office 365 migration, data recovery, troubleshooting related topics and writing blogs on the same. In her free time, she likes to train the kids in performing arts.
Exchange Online Backup and Restore: A Complete Guide
Are looking for a solution to take Exchange Online backup? Also, you do not know how to import PST to Exchange Online? No need to panic. This article will let you know all possible ways to backup Office 365 Exchange mailbox to PST file and restore the Outlook data file back to the O365 account in an efficient manner.
Methods to Backup Exchange Online Mailboxes
In order to export Exchange Online mailbox to PST, there are various manual solutions available that one should follow. The manual methods are as explained below.
Manual 1: Using eDiscovery PST Export Tool
Microsoft offers an inbuilt tool, i.e. eDiscovery PST Export tool which allows migrating Office 365 mailbox to Outlook PST file. It is the easy and free solution to backup O365 Exchange user accounts to PST format. Now, to perform the same task, a user must have permissions to use eDiscovery tool. Follow the steps mentioned below to have the permission for the same.
- Login to Office 365 admin with valid credentials
- After that, navigate Admin >> Exchange option
- Then, click on the Permissions from the left pane and after that, click on Admin Roles >> Discovery Management option
- Here, to add roles and click on the ‘+’ sign. Then, below roles, click on Mailbox Import Export option.
- After that, click on + sign again under the Members option. Click on the name of the user once again. In last, click on the Save button
- All this will grant permission to a user to access the eDiscovery Export tool. This process will grant permission to the before mentioned username only.
Now, it’s time to start the Office 365 Exchange backup process.
- Go the EAC or Exchange Admin Center
- Click on the Compliance Management from the left pane of the screen
- Then, click on the In-Place eDiscovery & Hold option
- Now, choose the mailbox items that you want to export from the list view
- After that, click on the Download icon and begin export to a PST file process
- Now, you need to perform the below-listed steps in the eDiscovery PST Export Tool and backup Exchange Online mailbox:
- To start the process, click on the Browse button and set the folder path where you want to save the output PST file
- After that, check the Enable deduplication checkbox and delete all duplicate emails. It keeps only one copy of each email
- Now, you can tick the box next to Include unsearchable items. It will add those mailbox items also, which is out of reach by Exchange Search. All these email files are stored in some separate PST file
- In last, click on the Export to begin the migration process and backup Exchange Online mailbox to Outlook PST file. A process box will appear, which indicates the ongoing migration process.
Manual 2: Configure Exchange Online in Outlook
- First of all, add the source email account to MS Outlook like adding your Gmail account to Outlook 2016
- After that, add your Exchange Online email account to MS Outlook. As you do this, Outlook gets synced with Office 365 automatically. You can easily see your content of Office 365 account in MS Outlook
Methods to Import PST to Exchange Online Manually
There are various possible methods available to copy/ import Outlook PST to Exchange Online manually and all of them are discussed below.
Manual 1: Using Network Upload
In order to upload PST to Exchange Online, follow the steps mentioned below:
Step 1: Copy SAS URL & Install Azure AzCopy
SAS URL is the storage location of Azure in the Microsoft cloud that contains SAS key i.e. Shared Access Signature key also. With the help of this key, one can have all the required permissions to upload or copy Outlook PST files to the Azure storage location.
Tip: One must use Azure Azcopy with version 5.0 for successful migration of PST file.
- To start, go to the https://protection.office.com address
- After that, sign in to Office 365 admin account by entering valid credentials
- Click on the Data Governance from the left pane and then, click on the Import button
- Now, on the Import page, click on Go to the Import service option
- Then, click on the New Job option >> Upload email messages (PST files) to move data
- As you click on the Upload files option, the following page will appear:
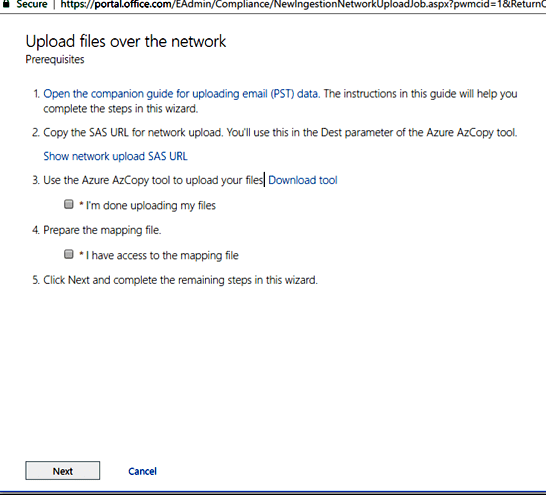
- Here, click on the Show network upload SAS URL option and copy & save the URL
- To download & install Azure AzCopy, click on the Download tool option
- Now, a window will pop-up, click on Run option
- In last, to exit the page, click on Cancel option
Step 2: Import Multiple PST Files to Exchange Online
- To start migration, open a Command Prompt on the system
- After that, navigate to that location where AzCopy.exe is installed
- If you have installed the application on the local machine, which is: %ProgramFiles(x86)%\Microsoft SDKs\Azure\AzCopy
- Then, you need to run the below-mentioned command to migrate PST file to Exchange Online:
AzCopy.exe /Source: (PST files location) /Dest: (SAS URL) /V: (Log_file _location)
Step 3: View the PST files list that is Uploaded to Exchange Online
It is an optional step to check and verify the migration of PST file to Azure.
Step 4: Create File for PST Import Mapping
Now, you need to make a CSV or comma separated value file, which about the user’s mailboxes where the Outlook data file is to be imported.
- Download the copy of PST Import mapping file
- After that, store the CSV file to your local machine
Step 5: Create Outlook PST Import job in Office 365
- Navigate to the address: https://protection.office.com
- Sign in to the Exchange Online admin account with valid credentials
- After that, go to Data Governance and click on Import option
- Now, click on Go to the Import service option
- On next page, click on click New job or on + sign, and then, click Upload email messages (PST files) option
- Check the I am done uploading my files and on the check boxes I have access to the mapping file check box and then, on Next
- After that, type in PST import job and click Next to proceed
- In order to add PST Mapping, click on Add button
- Now, choose the CSV file name from the list and click on Validate button to check the CSV file errors
- After PST file mapping, read the terms & conditions, and check the respective checkbox
- Now, you can click on the Finish button to submit the job successfully
- You can check the job in the displayed list of PST Import on the Import data to Exchange Online page
- Then, select the job and press Refresh to update the status
Manual 2: Using Drive Shipping
Another possible way to import Outlook PST to Exchange Online is with the help of drive shipping. To do the same, follow the steps mentioned below:
- To begin the process, copy the PST file to a BitLocker-encrypted hard disk
- After that, physically move the drive to Microsoft
- As Microsoft received the hard disk, the data personnel will add the received PST database to some temporary place in the Microsoft cloud
- Then, use the import service of Exchange Online and move PST to Office 365
Limitation of Manual Methods
There are various possible limitations that a user might encounter to perform Exchange Online backup and restore using manual methods. Some of those limitations are as follows:
- Configuring each and every Office 365 account to Outlook is time-consuming as it doesn’t allow to backup Office 365 multiple Office 365 users at once.
- The Backup process requires administration permission to use an inbuilt utility. All such things make the Exchange Online backup and restore process more complicated.
- The manual may not preserve technical attributes after backup and restore process.
One-stop Solution to Backup & Restore Exchange Online
In order to have an effortless solution to take Exchange Online backup and restore one can directly switch to any professional solution like SysTools Office 365 Backup & Restore tool. The tool is developed in such a way that, it takes Office 365 backup in PST & EML format and also imports PST file to Office 365 mailbox without any hassles. The best part about the software is that it is also capable to perform backup and restore on multiple user accounts at a time using an advanced feature. Moreover, the utility performs complete data migration in both backup and restore cases.
Let’s Sum It Up
Backup of mailbox data is really important to overcome any disaster, so it can easily be restored whenever required. Similarly, users want to restore Exchange Online data back to their accounts too. Considering the requirement of users, all possible solution of Exchange Online backup and restore are covered in this blog. Users are free to go for any of above methods based on their convenience.
Be First to Comment