Microsoft Office 365 Message Encryption
In this post, I will look at configuring message encryption in Office 365. What is message encryption?
Microsoft Office 365 Message Encryption is an extra add-on online service build on Microsoft Azure Right Management (Azure RMS), By enabling Azure RMS administrators can configure message encryption by configuring exchange online transport rules. The Rules can apply to multiple or only a few users i.e. CEO who needs to send encrypted emails across the internet.
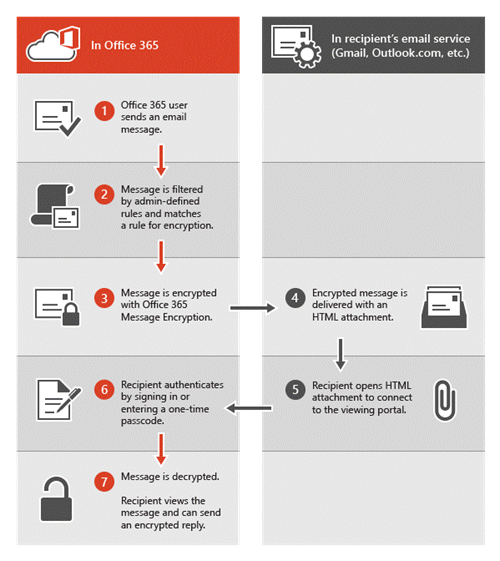
The Following diagram showcase the flow of the encrypted email.
To get started with the setup we need to make sure that we have the prerequisites completed. In order for us to make use of the service we need the following.
- Microsoft Office 365 organization for Exchange Online or Exchange Online Protection subscription this will include Azure RMS subscription.
The next step would be to enable Azure RMS before we can continue, let’s have a look at how to enable Azure RMS.
Azure RMS has some prerequisites that we need to follow as well and they include the following.
- Supported operating System: Windows 10, Windows 7, Windows 8, Windows 8.1, Windows Server 2008, Windows Server 2008 R2, Windows Server 2012, Windows Server 2012 R2
- Minimum version of Windows PowerShell: 2.0
- Microsoft .Net Framework: 4.5
Next, we can download the Azure RMS PowerShell Module Here: https://www.microsoft.com/en-us/download/details.aspx?id=30339 .
From the local folder double click the exe file (WindowsAzureADRightsManagementAdministration_x64) to start the Azure AD RMS Setup wizard.
Next open PowerShell and the following cmdlet to import the newly installed modules.
|
1 |
Import-Module AADRM |

To see which cmdlet is available for the newly imported module type the following.
|
1 |
Get-Command -Module ADDRM |
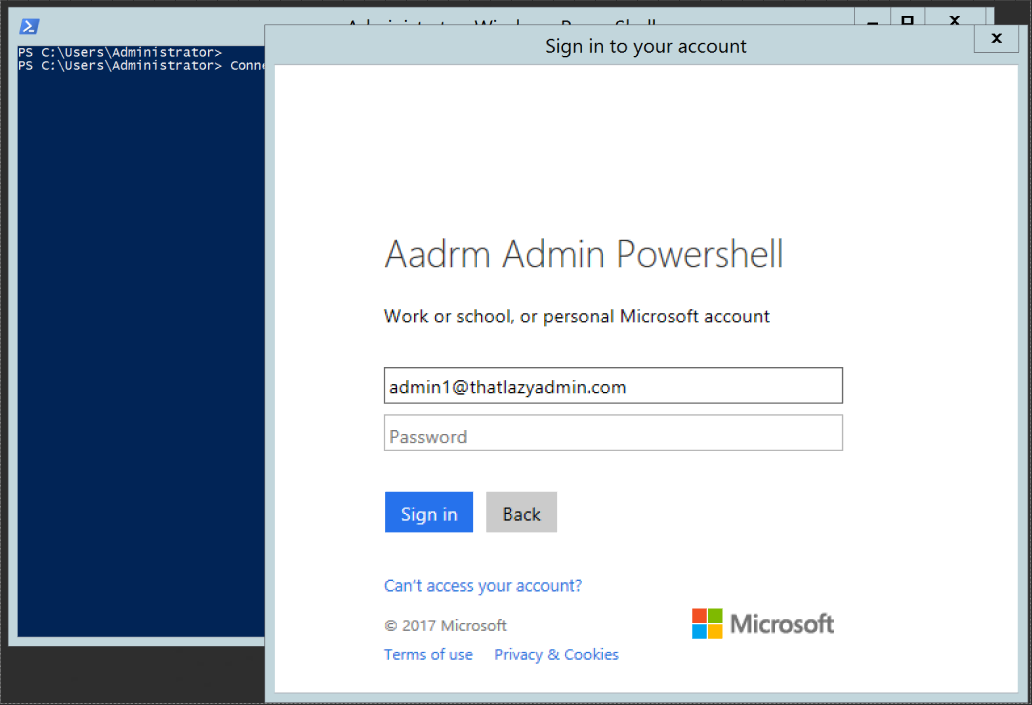
To get started we need to connect to Azure RMS, type the following cmdlet and enter the credentials of a Global Administrator.
|
1 |
Connect-AadrmService |


Now that we have a successful connection establish with Azure RMS, we can go ahead and run the following Cmdlet to Enable Azure RMS.
|
1 |
Enable-Aadrm |


For the purpose of this lab I will not active Azure RMS across all user in my Office 365 organization, instead I will configure Azure RMS to only allow the users to protect content using Azure RMS if they meet the following. Note If you don’t want all users to be able to protect files immediately by using Azure Rights Management, you can configure user onboarding controls by using the Set-AadrmOnboardingControlPolicy PowerShell command. You can run this command before or after you activate the Azure Rights Management service.
- Is part of an security group?
- Has an Azure RMS license?
I have created a security group on premise and used Azure ADSync to Synced to my Office 365 tenant, the group is called Azure-RMS-User. To set the Azure RMS On Boarding Control Policy to only apply the above mentioned conditions, type the following cmdlets.
|
1 |
Set-AadrmOnboardingControlPolicy -UseRmsUserLicense $True -SecurityGroupObjectId "c43c73b2-e025-4a4a-927e-44118102487d" -Scope All |


PS. To get the Security group Object ID. Launch Azure AD navigate to groups, select the group and in the properties page of the group on top you will see the security Object ID.
Now that we have successfully specified a security group and on-boarding policy for our Azure RMS service, now we need to go ahead and connect to Exchange Online to continue with configuring encrypted email messages for exchange online.
To connect to exchange online you can use a quick connect script I have created available on TechNet. https://gallery.technet.microsoft.com/office/Connect-To-Office-365-9b235018
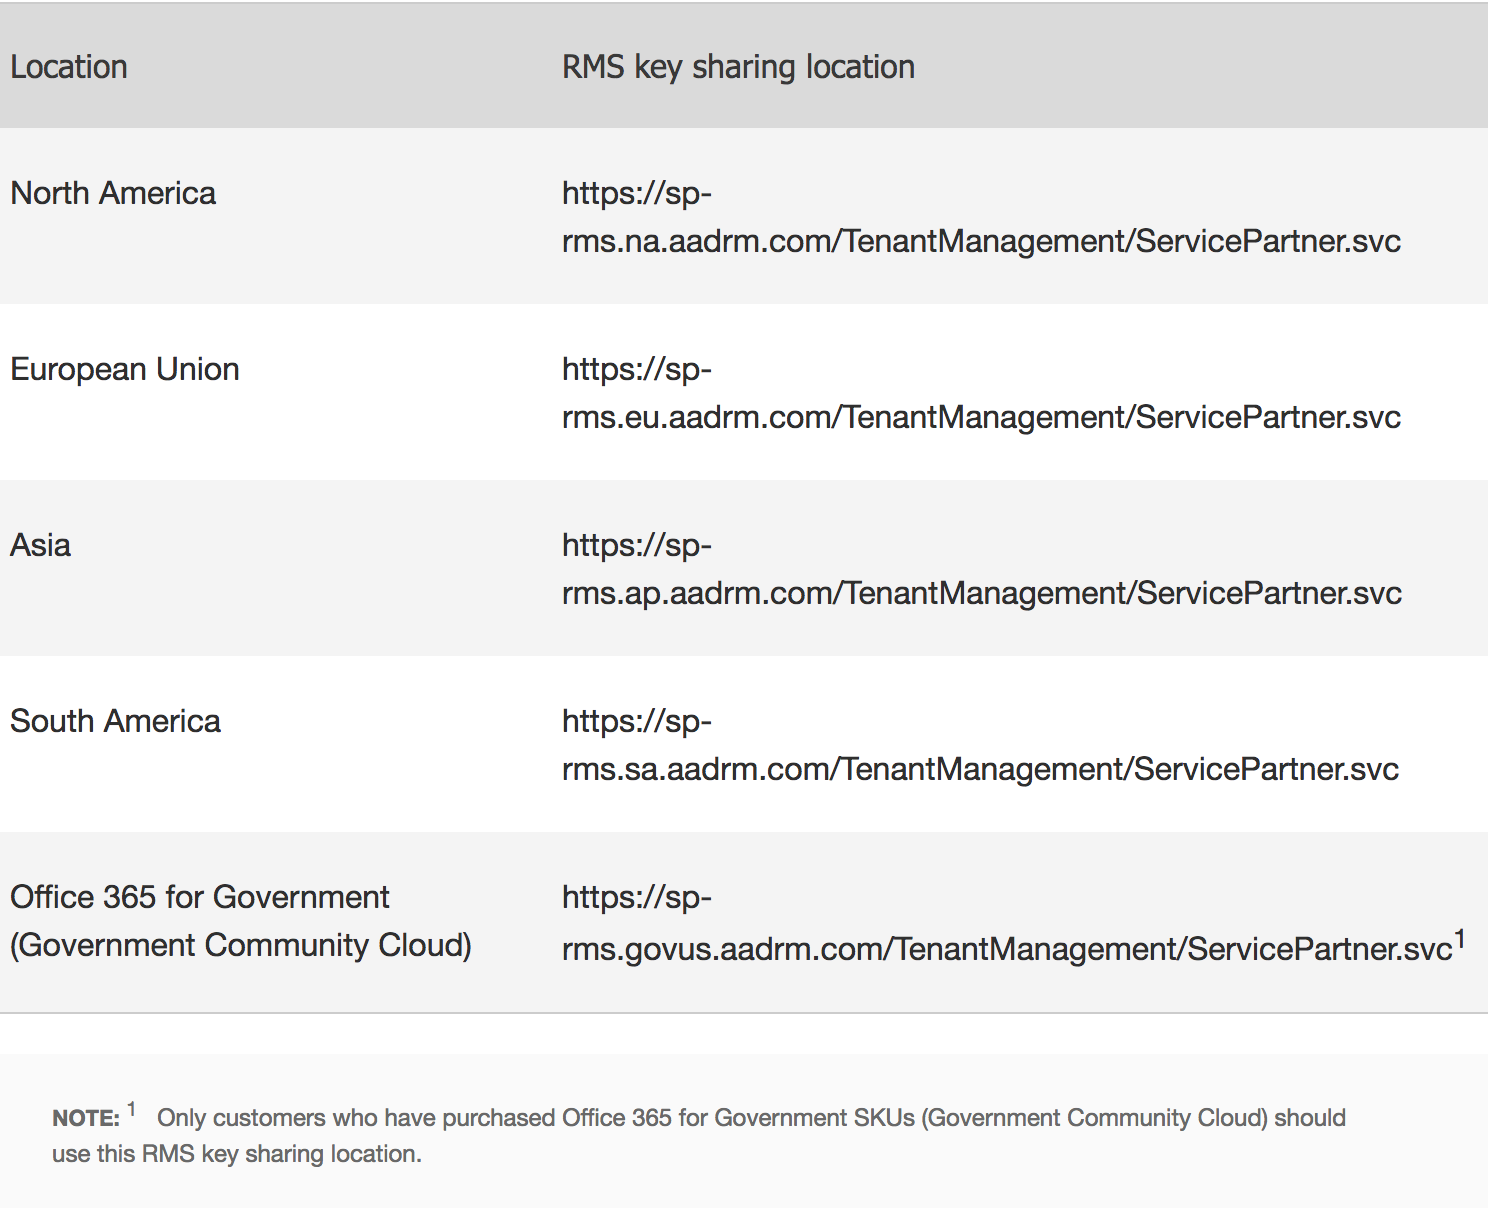
The next step would be to configure the Rights Management Services (RMS) online key-sharing location in Exchange Online. Use the RMS key sharing URL corresponding to your location, as shown in this table:
For this example, I will use Europe as my RMS Online key sharing location as that is where the 365 tenant is hosted, to configure type the following cmdlet.
|
1 |
Set-IRMConfiguration -RMSOnlineKeySharingLocation "<a href="https://sp-rms.sa.aadrm.com/TenantManagement/ServicePartner.svc">https://sp-rms.eu.aadrm.com/TenantManagement/ServicePartner.svc</a>" |

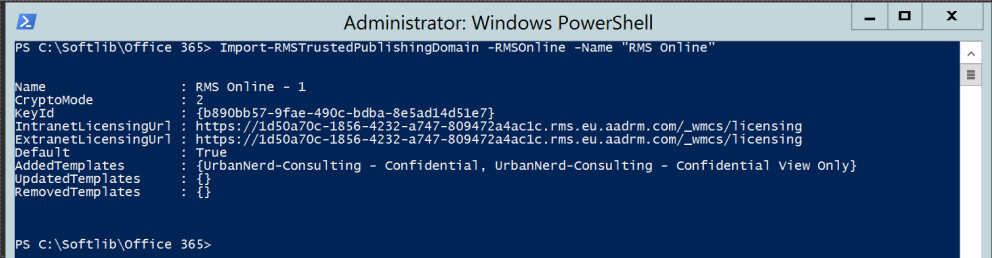
Next, we need to import the Trusted Publishing Domain (TPD) from RMS Online using the following cmdlet.
|
1 |
Import-RMSTrustedPublishingDomain -RMSOnline -Name "RMS Online" |

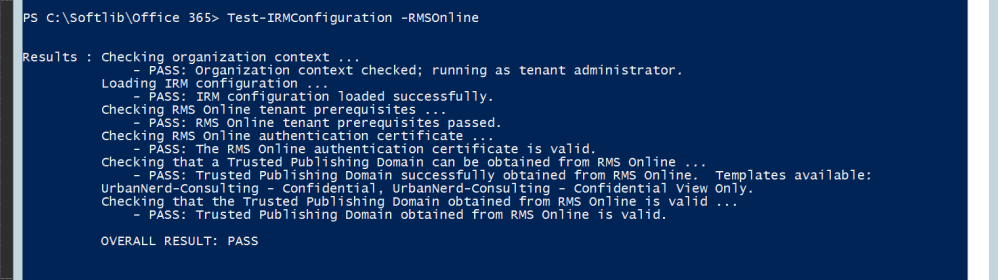
Now lets go ahead and test the configuration if it passes all test by running the following cmdlet. Among other things, the command checks connectivity with the RMS Online service, downloads the TPD, and checks its validity.
|
1 |
Test-IRMConfiguration -RMSOnline |
If all tests are passed let continue to enable Office 365 email encryption by running the following cmdlet.
|
1 |
Set-IRMConfiguration -InternalLicensingEnabled $true |

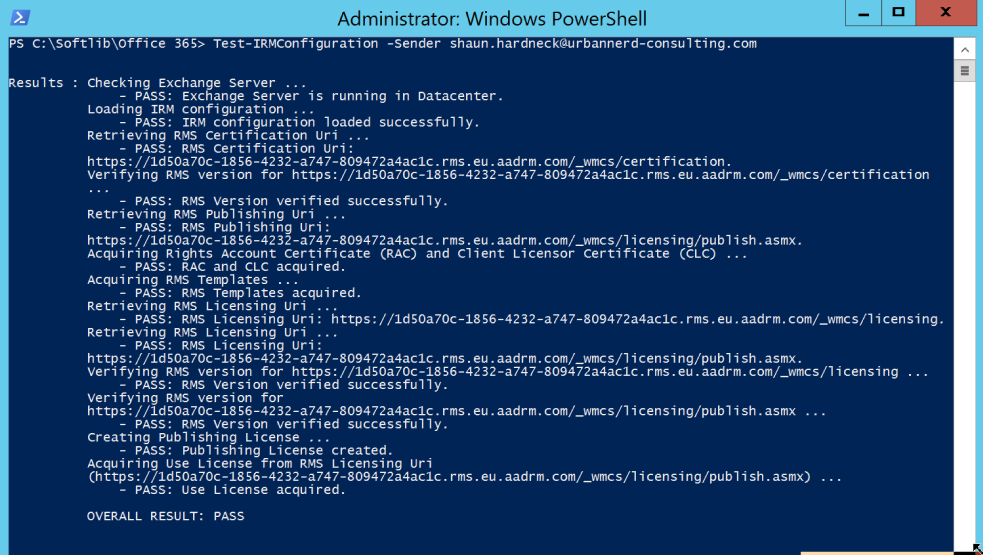
To verify that you successfully imported the TPD and enabled IRM, use the Test-IRMConfiguration cmdlet to test IRM functionality.
|
1 |
Test-IRMConfiguration -Sender me@thatdomain.com |
To disable IRM templates in OWA and Outlook, type the following. However, I will not be disabling for this demonstration.
|
1 |
Set-IRMConfiguration –ClientAccessServerEnabled $false |
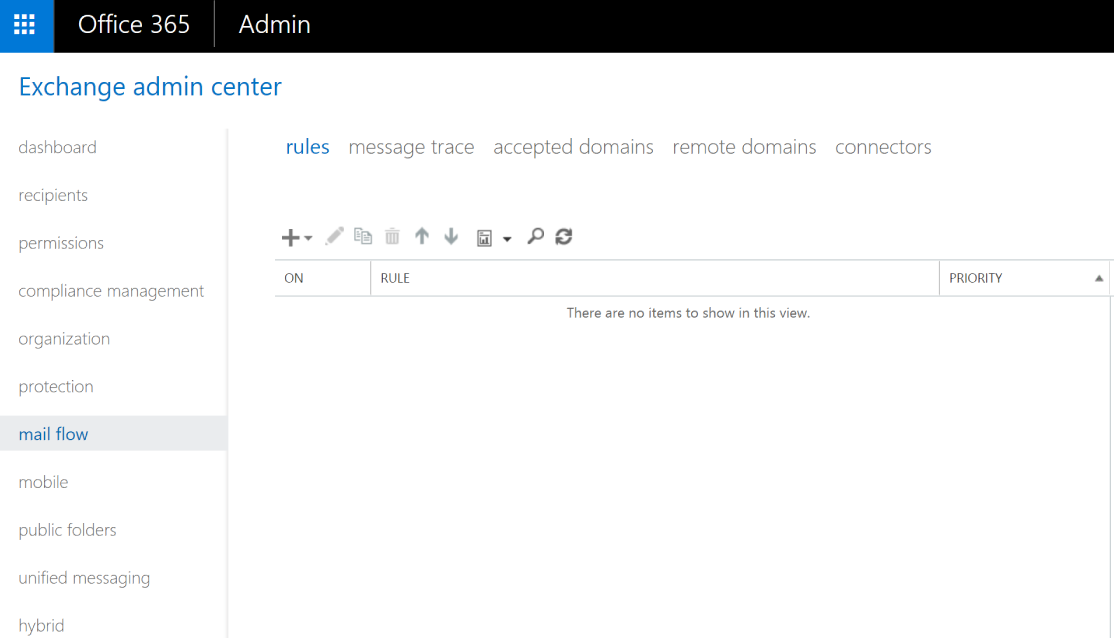
For the next part of the configuration we need to create a transport rule in exchange online for encrypted email messages. To get started we need to login to Office 365 Portal and navigate the Exchange Online.
Url: https://portal.office.com
In the exchange, online admin console select mail flow and then click on the + to create a new transport rule.
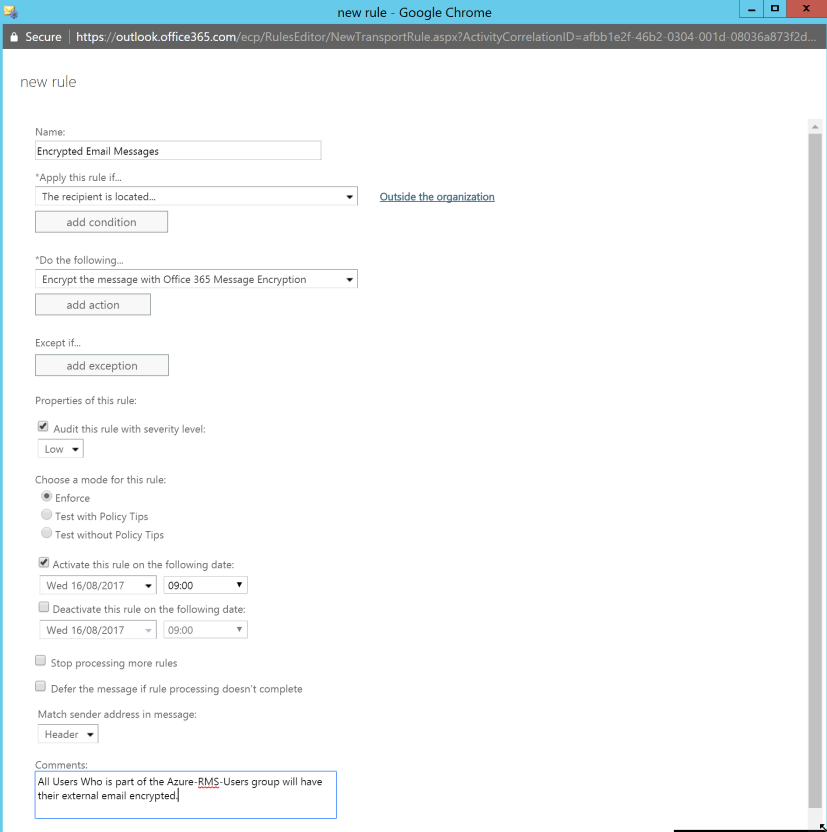
For the purpose of this demonstration I will create a transport rule to encrypt all external emails sent from the users in the security group which we have applied the Azure RMS template.
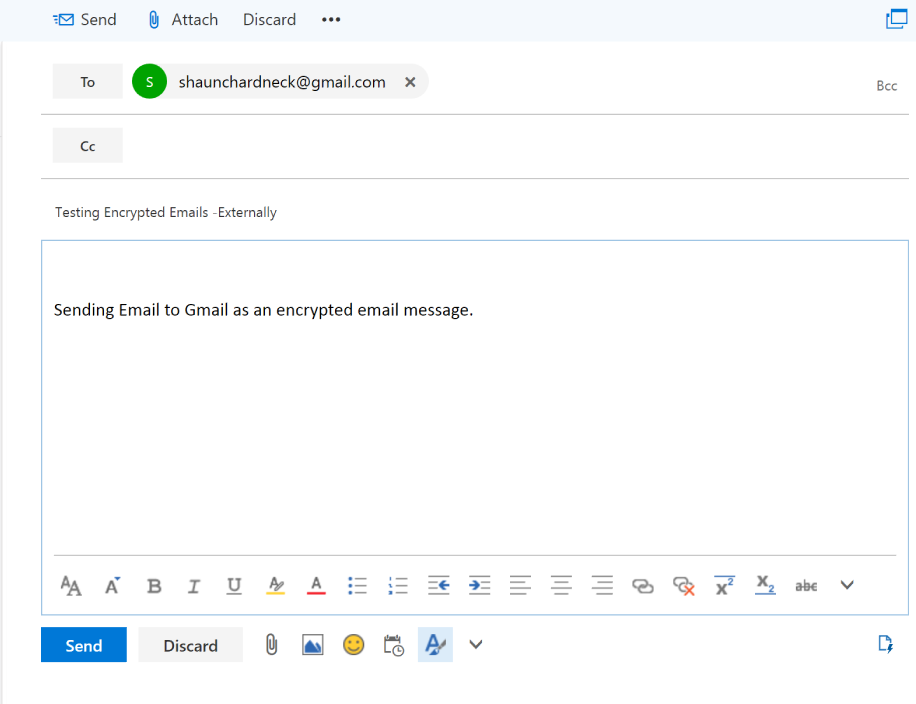
Our final step would be to test if external emails will be encrypted when a mail is being sent from Office 365.
Simple from the user side they don’t have to make any changing or compose an email any differently, so I will just create a simple new email and sent to a Gmail address.
Let’s view the encrypted email in Gmail.
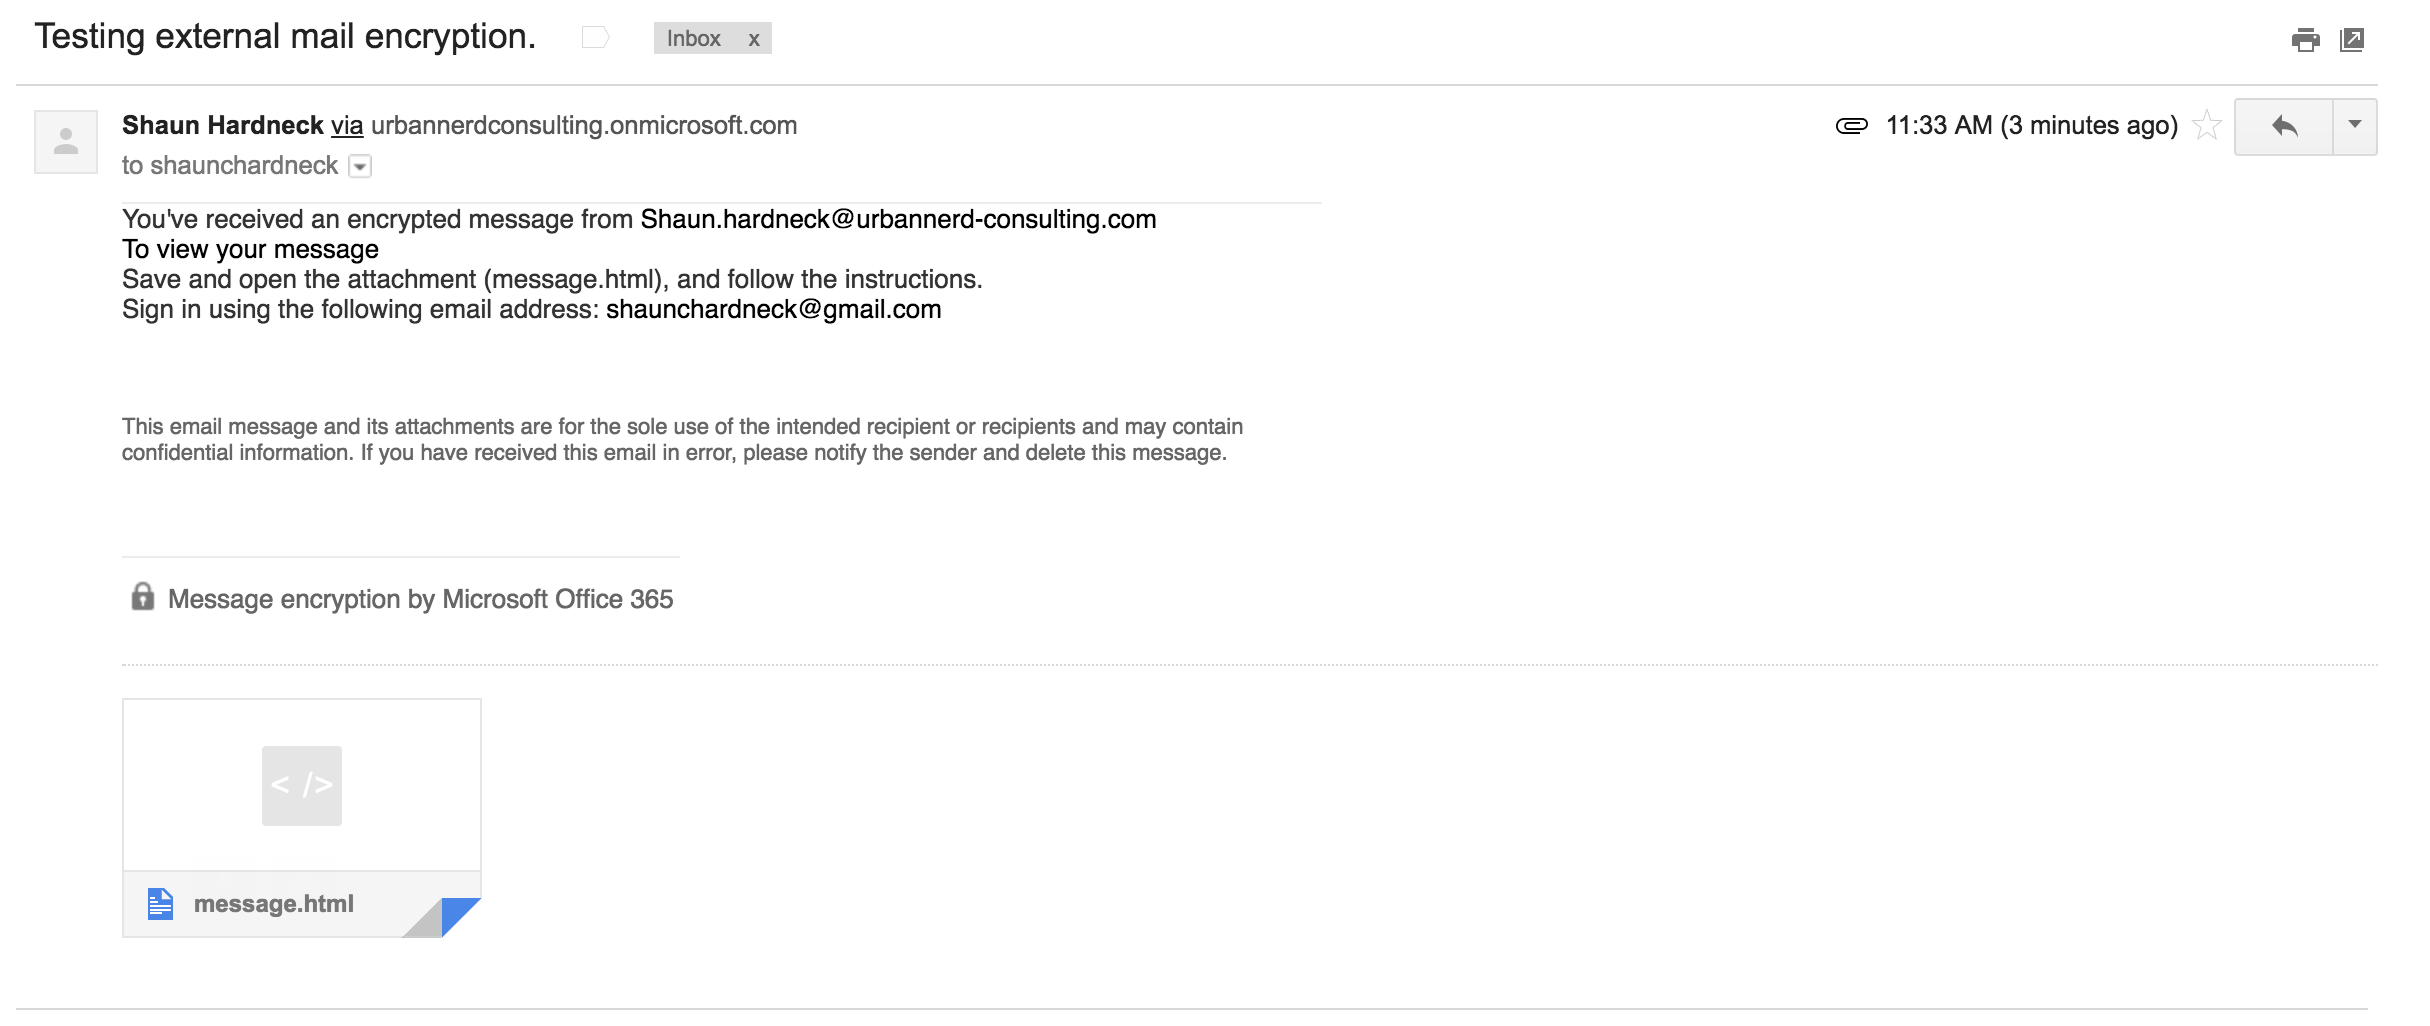
As we can see the email is not in a normal easy readable format, the message in the body of the email also explains on the next steps on how to read the email.
This requires the user to download the email and then login with the email address which they have received the email on.
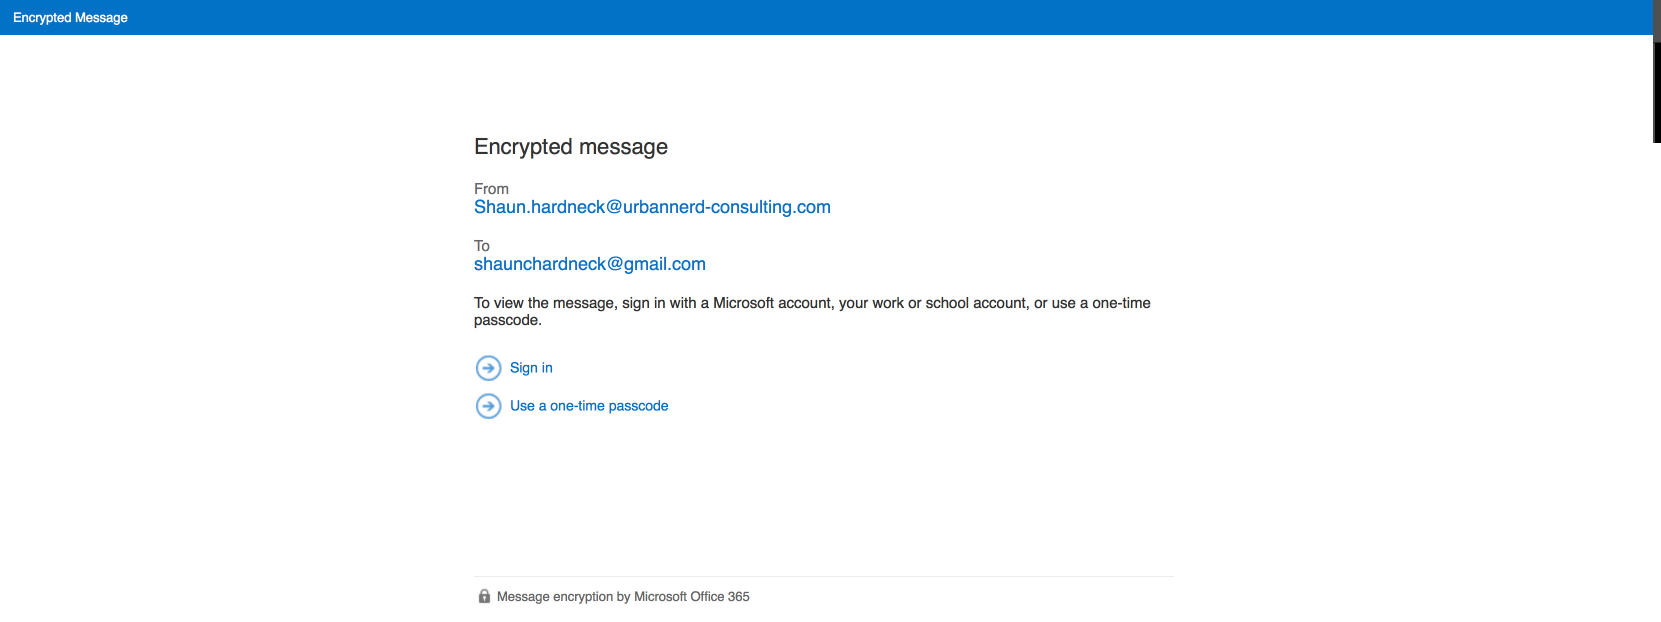
Once you open the downloaded email file, you will be redirected to an Office 365 encrypted message page to login. Because I have sent an encrypted email to a Gmail address I won’t be able to use the Microsoft sign-in options so I will have to request a One-time passcode.
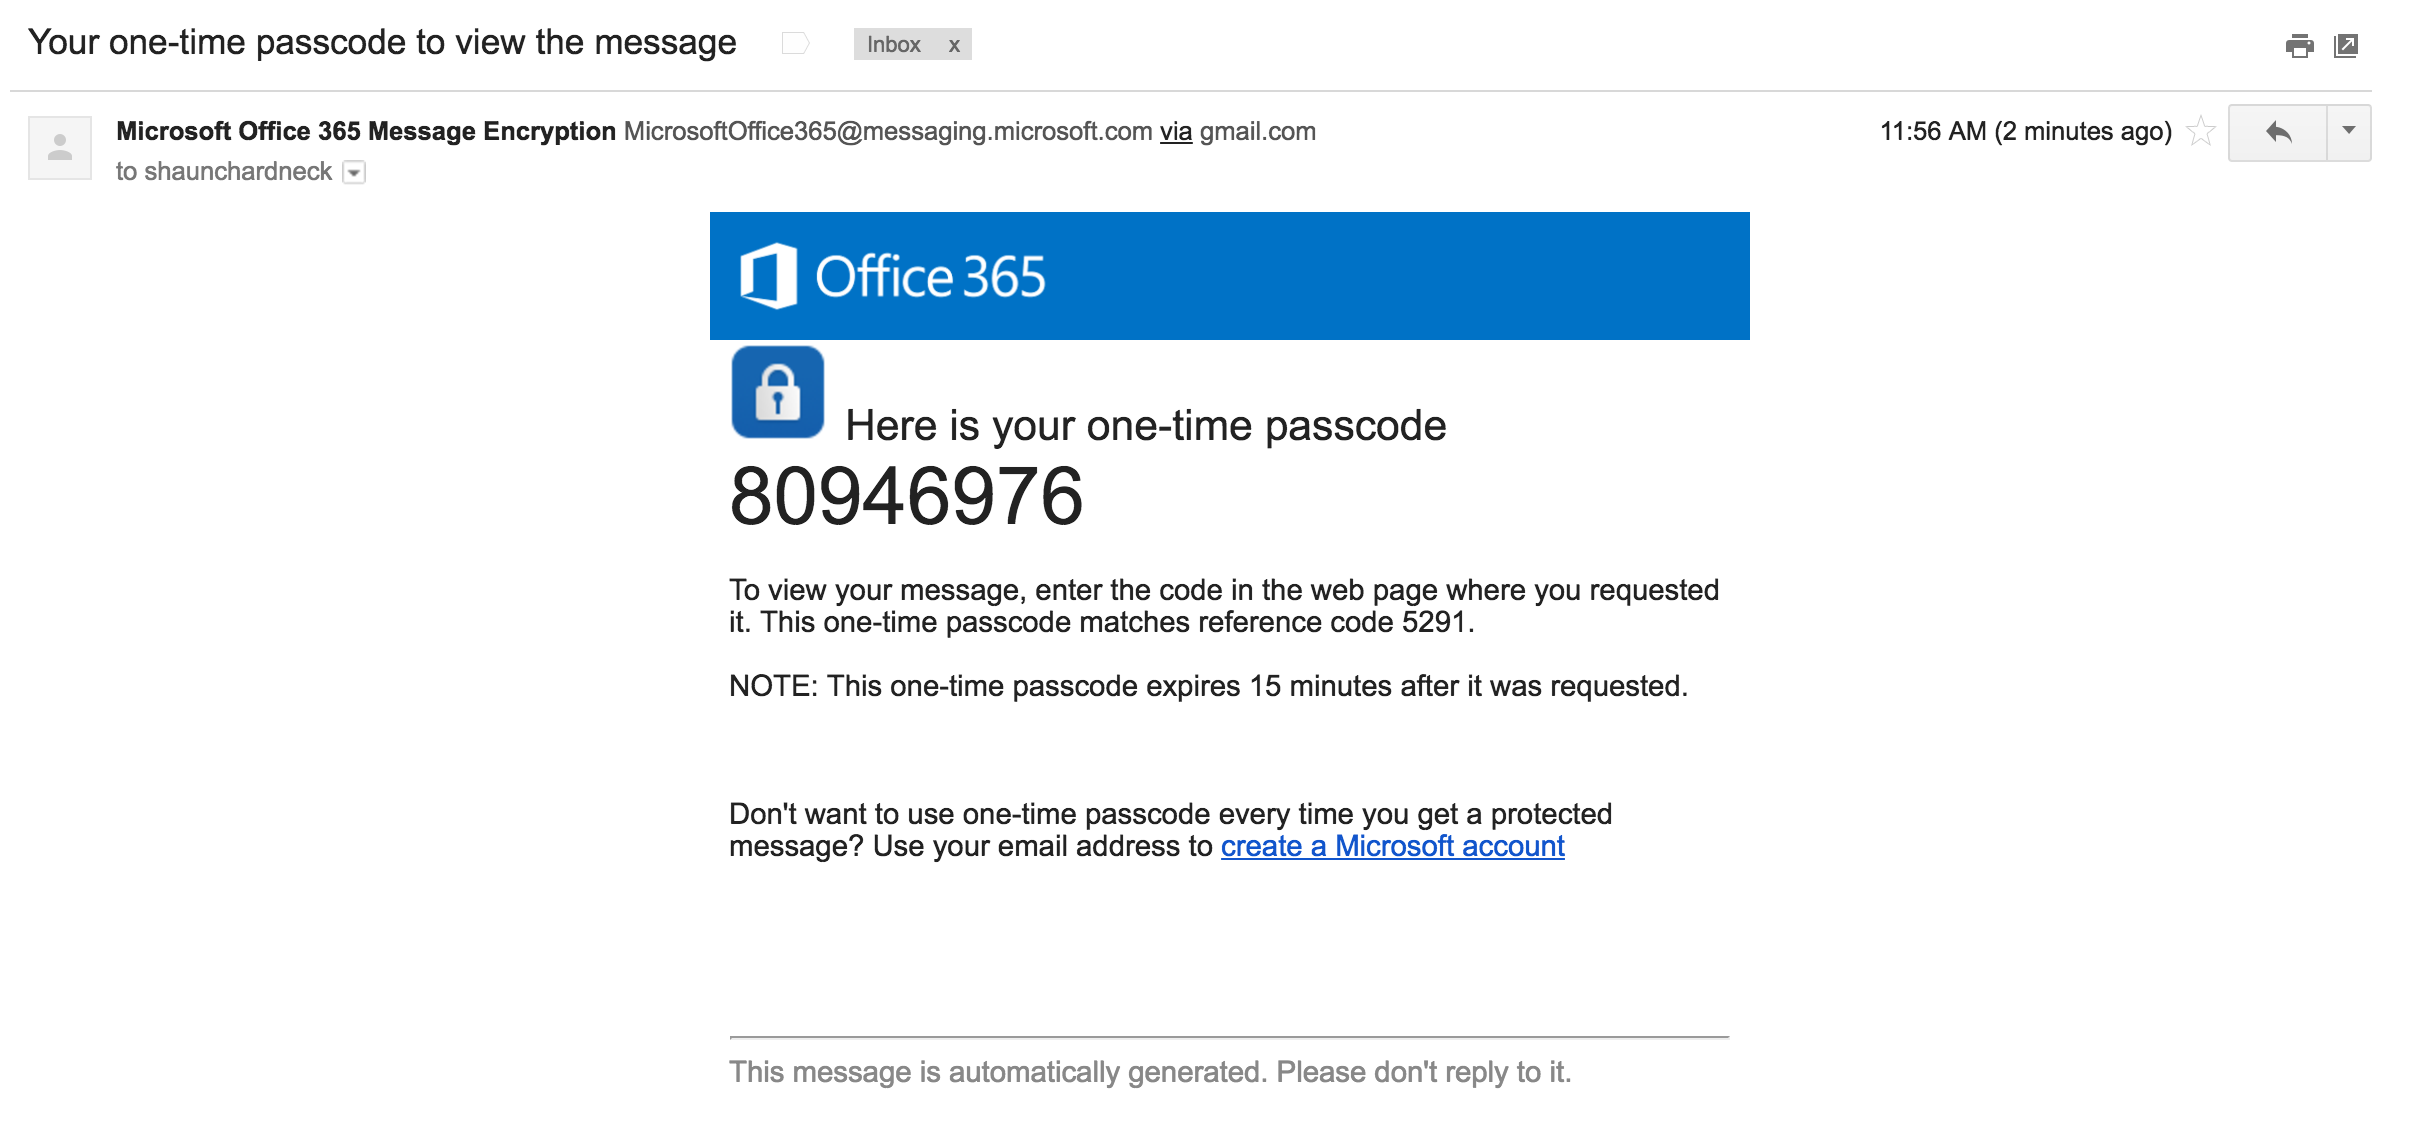
Once you have selected the one-time passcode and email with a passcode will be sent to the email address on which you have received the encrypted email.
The email with the passcode looks as follows.
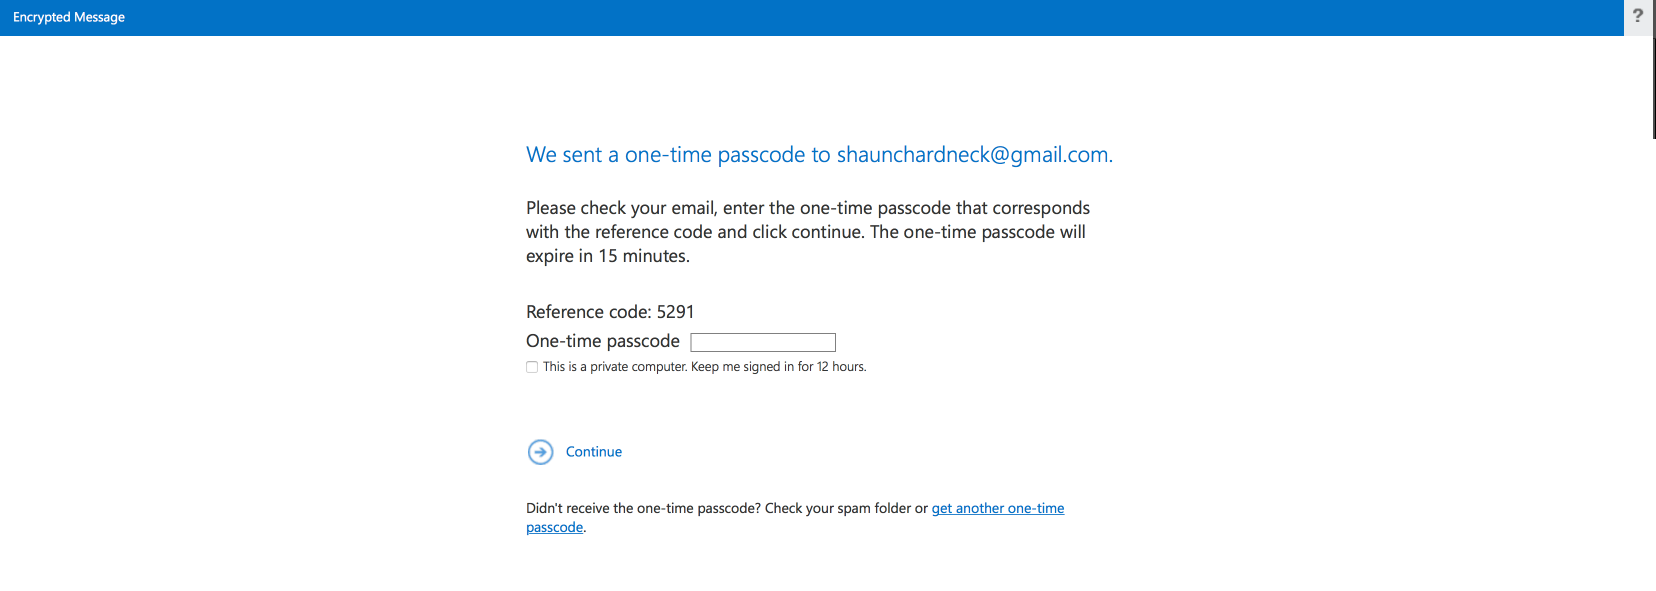
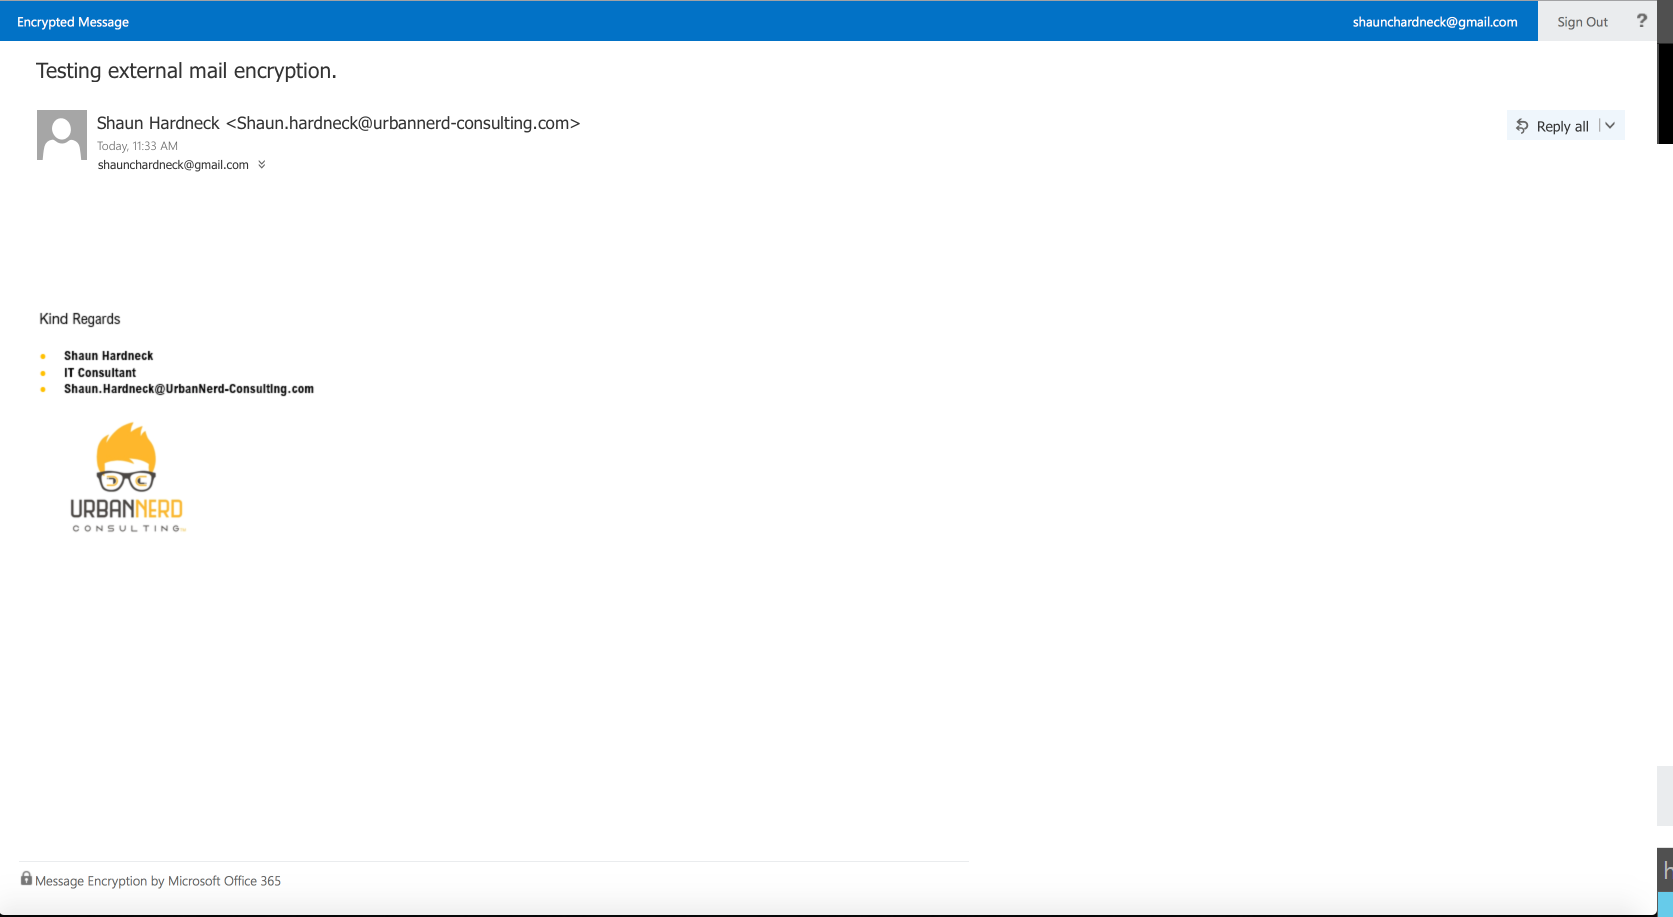
Once you have entered the one-time passcode for the encrypted email message, you will then be redirected to an OWA page where you can read the decrypted email message.
I know that was a mouth full to configure Office 365 Encrypted Email Messages, but once you have configured this for the first time it’s very less administrative efforts to maintain.
#ThatLazyAdmin

Offcie 365 Message Encryption has new capabilities available. See:
• Blog announcement – https://aka.ms/ome2017
• Ignite 2017 session – https://aka.ms/omevideo
• Ignite 2017 session deck – https://aka.ms/omedeck
• Configure OME – https://aka.ms/enableome
• Configure BYOK – https://aka.ms/setupAIPKey
• End to end workflow – https://aka.ms/omeoverview